Tuesday, February 11, 2014

Tuesday OOTD, FOTD, and Super Easy Winged Liner!

OOTD and FOTD

I have the luxury of being able to wear whatever I want to work.  Sometimes, I get stuck in a rut and just wear my workout clothes.  But sometimes, it's nice to glam up a bit (and by glam up, I mean wear jeans) and look nice.  I'm really not trying to impress anyone, but I do notice that when I look better, I feel better, and this often leads to a good day.  Here's what I wore to work today:

Outfit:
-Top: Express
-Jeans: Express
-Boots: White Mountain brand from DSW

(And of course, Augie's head snuck into the picture)


Eyes:
-Lorac Primer
-Makeup Geek Eyeshadows in Cinderella (lid), Creme Brule (blending color above crease), Mocha (outer portion of lid and crease), Shimma Shimma (inner corner)
-Makeup Geek Eyeshadow in Corrupt (liner on top)
-Makeup Geek Eyeshadow in Mocha (liner on bottom)
-L'Oreal Carbon Black Voluminous Mascara
-Tarte Lights, Camera, Flashes Mascara
-Bobbi Brown Eyeshadow in Mohogany (brows)

Face:
-Clinique Super Primer 
-Bobbi Brown Corrector in Light Peach (under eyes)
-Neutrogena Skin Clearing Concealer in Medium (on blemishes on forehead because my acne decided to join the party today.  This covers it up well!)
-Bobbi Brown Foundation Stick in Warm Natural (to cover redness around nose)
-Bare Minerals Original Foundation in Medium Tan 
-Physician's Formula Happy Booster Bronzer
-Bobbi Brown Blush in Sand Pink
-Bobbi Brown Shimmer Brick in Bronze

Lips:
-Revlon Super Lustrous Lipgloss in Pink Pop


Easy Peasy Winged Eyeliner

Going over any kind of black liner (liquid, gel, or pencil) with an angled brush and black eyeshadow helps to soften the look and smooth out any bumps.  I recently purchased the Makeup Geek Eyeshadow in the color Corrupt, which is a SUPER black black.  It's by far the most smooth and pigmented black shadow I've ever seen.


I decided to put this to the test and see if it could perform as a good eyeliner on its own.  And sure enough, it did. 


This was the quickest and most fool proof way I've ever found to do winged liner.  I just swept an angled brush (my faithful Sedona Lace Small Angled Brush E561) through the eyeshadow, drew it on, and voila.  It looks soft, yet due to the awesome pigmentation of the shadow, it still looks defined.  If you have a hard time with your winged eyeliner, definitely give this technique a try.  You can use any black or brown eyeshadow, but I would HIGHLY recommend the Makeup Geek shadows--obviously by the sheer number of shadows I used in this look, you can tell I love them.  They're cheaper than MAC's shadows but just as good (in fact, I think they're even more pigmented).  

Thank you for reading.  Hope you're all having a great week!!

CC

Sunday, February 2, 2014

Super Bowl FOTD

Hello everyone, I just wanted to hop on and do a super quick FOTD before I head off to watch the Broncos!!


I didn't have any orange eyeshadow but was able to incorporate some blue liner into the look. I did some bronze eyeshadow on the lid and pretty neutral face makeup and lipstick.  I also went with Broncos colors on my nails.  Here's what I have on:

MAC Eyeshadow in Mulch (lid)
Makeup Geek Eyeshadows in Creme Brule, Latte, Cocoa Bear (for crease blending)
Maybelline Eye Studio Lasting Drama Gel Liner in Black (upper lash line)
Ulta Automatic Eyeliner in Cobalt (lower lash line--also blended this out with Makeup Geek Creme Brule on  pencil brush)
Bobbi Brown Eyeshadow in Mahogany (eyebrows)
L'Oreal Voluminous Carbon Black mascara
Tarted Lights, Camera, Flashes mascara
NYX Blush in Dusty Rose
L'Oreal True Match Super Blendable Powder in Cappuccino (used this as bronzer/contour)
Bobbi Brown Shimmer Brick in Bronze
Essence lipstick in Creamy Nude

Thank you so much for reading!

CC

Sunday, January 26, 2014

Recent Favorites and FOTD

Since I love experimenting with different products (and since I have a lot of makeup), it's rare for me to wear something for several days in a row--let alone almost an entire month straight.  Most of the products I'm about to mention are new to my collection, whether they were Christmas presents or just something I treated myself to.  Without further ado, I'll jump right into my most recent loves.

Face
My standout face product of the month is the one and only Bobbi Brown Shimmer Brick in Bronze.  This compact makes the most BEAUTIFUL highlight of anything I've ever seen.  It has a nice sheen yet looks natural on the cheeks.  I like swirl all the colors together and dust it on the tops of my cheekbones (a typical spot for highlighting), then I lightly dust it over my cheeks on top of my blush.  The pictures don't do it justice--you just have to check it out for yourself.


Swatched on my hand is the combination of all colors.  Again, this does not do it justice!   

I know it's pricey at $42, and many companies have tried to dupe this.  When I really want an expensive product, I think on it long and hard and do tons of research on it before I plunge.  What I got from the reviews is that none of the dupes hold a candle to it.  It had been about six months since I'd started wanting one, so after reading reviews and waiting so long, I decided I had to have it and couldn't be happier about my decision.  I've literally worn this every single day since I purchased it.

I must also mention the primer and foundation I've been using this month. 


The primer, Urban Decay Pore Perfecting Primer Potion, was a Christmas gift from my mother-in-law that came with a mini sized Urban Decay setting spray.  I'd never tried this primer and immediately fell in love with it.  Since my skin has been a little drier from all the acne products I've been using, some primers and foundations have accentuated the dryness (not attractive!).  This did not.  It comes out white and has a very smooth, slightly silicone-y texture.  Once it blends into the skin, the whiteness goes away.  I like to put it on first thing, do my eye makeup as I let it dry, then do my face makeup.  I give this primer two thumbs up.

The foundation I've been using is one I've mentioned, Bare Minerals Original Foundation in the shade Medium Tan.  This is a long time favorite of mine and one I've purchased at least three times.  The shade is perfect for me right now since I'm still a little tan from Maui, and it provides the most perfect finish--it's not cakey at all, but it's not oily.  It just looks like beautiful skin.  Love, love, love it.  That plus the primer make a dynamite combination.

Lastly in this category, I'd like to give a shout out to the ELF Studio Blush in Mellow Mauve.  This is a really nice shade for winter that gives off a bit of sheen.  Oh, and let's not forget to mention that it's THREE DOLLARS!!  My mom complimented my blush one day when I was wearing this and wanted to know what it was.  I apply it with the Real Techniques Blush Brush.


Eyes
How on earth did I live before I had a brush like this??? I am referencing the Sedona Lace Universal Blender EB 09, which is the same type of brush as the Sigma E25 Blending Brush and the famous MAC 217 (but less than half the price!!). 


You're probably wondering what's so special about this brush.  I always wondered that too... until I finally bought it a couple months ago.  It really just does it all.  If you could only have one eye shadow brush, this would be the one to own.


You can pack color on your lid with the flat side, but you may also be able to see from this picture that it has a fluffy tip.  This is perfect for putting color in the crease.  I like to use the fluffy part to feather darker colors from my outer corner inward and up into the crease to create a nice gradient.  You can also turn it vertically and use the fluffy part to blend all your shadows together.  Everybody needs this brush or one like it.  Everybody.

Onto mascara.  I like to layer my mascaras, and lately I've been combining an old favorite with a new discovery. 


The old favorite is L'Oreal Voluminous Carbon Black.  If you've never tried this mascara, you need to.  It builds really well and creates amazing volume, although I find when you open a new tube, you have to use it for a couple weeks before it yields the best results.  Anyway, I like to do two coats of this mascara, let it dry, then go in for a third coat with Tarte Lights, Camera, Flashes.  This is a new mascara for me, and I'm using a sample size that came in the Lashtastic 8-Piece Mascara Discovery Collection, which was a Christmas present from my aunt.  So far, this is the only Mascara I've tried from the collection, but being a mascara junkie, I'm excited to try all the others!

Lips
My lip product category in general this month has been tinted lip balm.  It's low maintenance, you don't need a mirror to apply it, and it provides color plus moisture (critical for winter and especially for those of us living in dry climates).  My favorite of the month has been Burt's Bees Tinted Lip Balm.  The one pictured here is in the color Pink Blossom, but I've also been loving Rose (which is in my car at the moment).  These are so moisturizing and pretty at the same time!


FOTD
Finally, here is a quick face of the day.  I used all of the products I mentioned above.  For the eyes, I used some of the plum shades from the Lorac Pro Palette.  I love the shadows in this palette but am still trying to find the perfect plum combination.  I like what I did today but still think I can do better.


And that does it for my recent favorites.  Thank you so much for reading!

Much love,

CC

Thursday, January 2, 2014

Packing for a Trip: Makeup and Brushes

I'm super excited to travel to Maui with my husband and parents tomorrow, and what better time is there to blog about efficient makeup packing?  I always try to be prepared and give myself options but not bring more than I need.  It's important to think about what kind of trip you're taking, how often you'll be wearing makeup, and how much you'll be wearing.  I know I will be going to the beach almost daily and won't be wearing any makeup for that.  I probably will throw some on for going out to dinner or wherever else, but I know that any  makeup I do wear will be minimal and low maintenance.

If you've accumulated sample sized items over the last few months, trips are great opportunities to try those products out since their compact sizes are good for travel.  When packing, you want to think in terms of efficiency--how can you get the biggest bang out of the fewest amount of products?  Eye shadow palettes are great for travel.  I would recommend only bringing one palette--and make it your most versatile one.  I'm bringing my Makeup Geek Eyeshadows, which I've put in a Small Z Palette.  If you don't have to bring any single eye shadows, great!  The only single I'm bringing is for filling in my eyebrows.  If you have any blush/bronzer palettes or duos, those are great too.  This one is the ELF Studio Contouring Blush and Bronzing Powder.  Why bring two single products if you have a two-in-one compact?  For lips, I'm going super low maintenance and only bringing one lipstick and one tinted lip balm.

Face Products


Eye and Lip Products
The same logic applies for brushes--pack ones that have multiple uses.  For example, I'm only bringing one Angled Contour Brush to use for both bronzer and blush.  This Universal Blending Brush by Sedona Lace is a fantastic multi purpose brush that has become a staple in my routine.  This brush roll is a nice and compact way to pack brushes and came with this Brush Set from Sedona Lace.  Other tools to pack include tweezers and an eyelash curler.

If you're like me, you worry that you'll forget something.  The best tip I have to avoid this scenario is to pack your makeup and brushes a couple days in advance.  Do your makeup for the next couple days only with the packed products and brushes.  That way, if you realize in doing your makeup that you're forgetting something, you can just throw it in your bag.


I hope these tips help you pack for your next trip!

Sending love always,

CC

Sunday, December 29, 2013

Acne at 25

Yup, you read it right.  I'm 25 years old, and I still have acne.  I know that I am not alone and that many other adults still suffer from it as well.  As I explained in my last post, I've been inundated with breakouts in the last couple months.  I finally decided to switch up my skin care routine (obviously, what I was doing before wasn't working for me).  I wanted to share what I've been using and doing to clear up my face.  It has been working for me, and though my skin still isn't perfectly clear, I've seen a drastic improvement in the last month.  I'd also like to preface this post by letting you know that this is just what has been working for me, and I can't guarantee that it will work for you.  We are all unique with our skin, and my needs aren't necessarily the same as yours (even if we have a similar skin type).  If you are completely unsure about what to use on your skin, please see your dermatologist!

So, without further ado, let's get into my new skin care routine!

The Products:


 The two most common active ingredients used for fighting acne are salicylic acid and benzoyl peroxixde.  In my research, I found that benzoyl peroxide is stronger but can leave behind more discoloration from blemishes.  Since I have dark skin, and post-blemish marks are a problem for me, I opted for a mostly salicylic acid routine (all of the products I mention are from the drugstore). 

I've been using Clean and Clear Daily Soothing Acne Cleanser.  Not all salicylic acid cleansers are created equally--they vary from about .5% to 2% in strength (at least the over the counter ones do--prescription products may be stronger).  I opted for this product because it's 2% but claims to be gentle on the skin.  I like that it's a foaming cleanser, and I started out by using it morning and night.  I have since cut back to only using it at night, and I use a gentle cleanser with no acne fighting ingredients from Aveeno in the mornings.


After cleansing my face, I use this toner by Equate (the Wal-Mart version of the Clean and Clear Essentials Deep Cleaning Toner for Sensitive Skin).  They have two variations--one with 2% and one with .5% salicylic acid.  This is the .5% for sensitive skin, and I got this one because with all the products I'm using, I didn't want to over-dry my skin.  I use it morning and night.


I let the toner dry, then apply my eye cream as usual.  The next step is moisturizer, and I've been using this one with .5% salicylic acid (the Target brand of the Clean and Clear Essentials Dual Action Moisturizer).


 The final step is one I only use at night to spot-treat blemishes after I give my moisturizer a few minutes to sink in.  It's the Clean and Clear Persa-Gel 10 Acne Medication. 


 Results and Final Thoughts:
I've only been using these products for one month, and my skin has definitely improved.  After about a week, my skin felt more dry, and I also noticed flaking.  I expected this to happen, as the salicylic acid helps skin cell turnover (the flaking comes from the ingredient working to slough off dead skin cells).  This makes it an effective acne treatment because you won't have as many dead skin cells clogging your pores.  However, you still need to exfoliate.  Twice/week, I swap out the Clean and Clear cleanser for a gentle exfoliant at night (I use the Aveeno Positively Radiant Daily Scrub).

If you already have drier skin, I would recommend only using all these products once/day.  You may also want to add something more moisturizing on top of the salicylic acid moisturizer.  Also, if you're going to be out in the sun, make sure you use sunscreen on your face.  I haven't been, but come summer, I'll be using a sunscreen over the moisturizer

The fact that I've also not been wearing makeup as often is worth mentioning.  I have basically stopped wearing liquid foundation (something I used to wear daily) except for special occasions or if I want my skin to look especially flawless.  Instead, I've been going with a naked face whenever I can to let my skin breathe (which is hard when you want to cover up your acne!).  When I still want some color on my face, I use a BB cream or a primer with light powder foundation over it (I recently re-discovered an old love, the Bare Minerals SPF 15 Foundation).  I like this product because it makes your skin look healthy and provides coverage--plus, it doesn't have all the heavy ingredients my liquid foundations have.  I plan on continuing with this routine and going light-handed with products on my face, and with any hope, I'll have clear skin one day!  To any of you out there going through the same thing, I hope this was helpful.  Thanks so much for reading!

xoxo,

CC

Thursday, December 26, 2013

A Long Absence and A New Year

I would like to take this opportunity to apologize for my long absence on this blog.  It was really not intentional; I just let things get in the way.  I think part of it was due to the unwelcome influx of acne that has taken over my forehead in the last couple months.  I've been too embarrassed to take pictures, and I have also been not wearing much makeup in an effort to let my skin breathe.  But I know that's just an excuse, and I shouldn't let that stop me from doing what I love.  I also realized that writing about my acne and what I've been doing to clear it up would make a good post--so stay tuned for that!

I've missed blogging, and if you're still with me despite my absence, I appreciate it!  We are about to that time of year where we all make New Years resolutions, and one of mine is to keep up with this blog.  There are always excuses to keep you from doing what you love, and being "too busy" or "too tired" are among them.  The key is to not let those excuses get in the way, as I have done with this blog.  I'm realizing that I have to make time for what I love... I need this creative outlet.  It's also easy to tell yourself that you'll just do it tomorrow or next week or next year.  I am out of excuses!  The future is guaranteed to nobody--all we have is this very moment that is right now.  So, right now, I am writing and also making a promise to all of you and to myself to try harder to keep up with my writing.  Thank you all so much for your love and support!!

Much love to all,

CC


Wednesday, October 30, 2013

Amazing Eyeshadow Palette Under $5

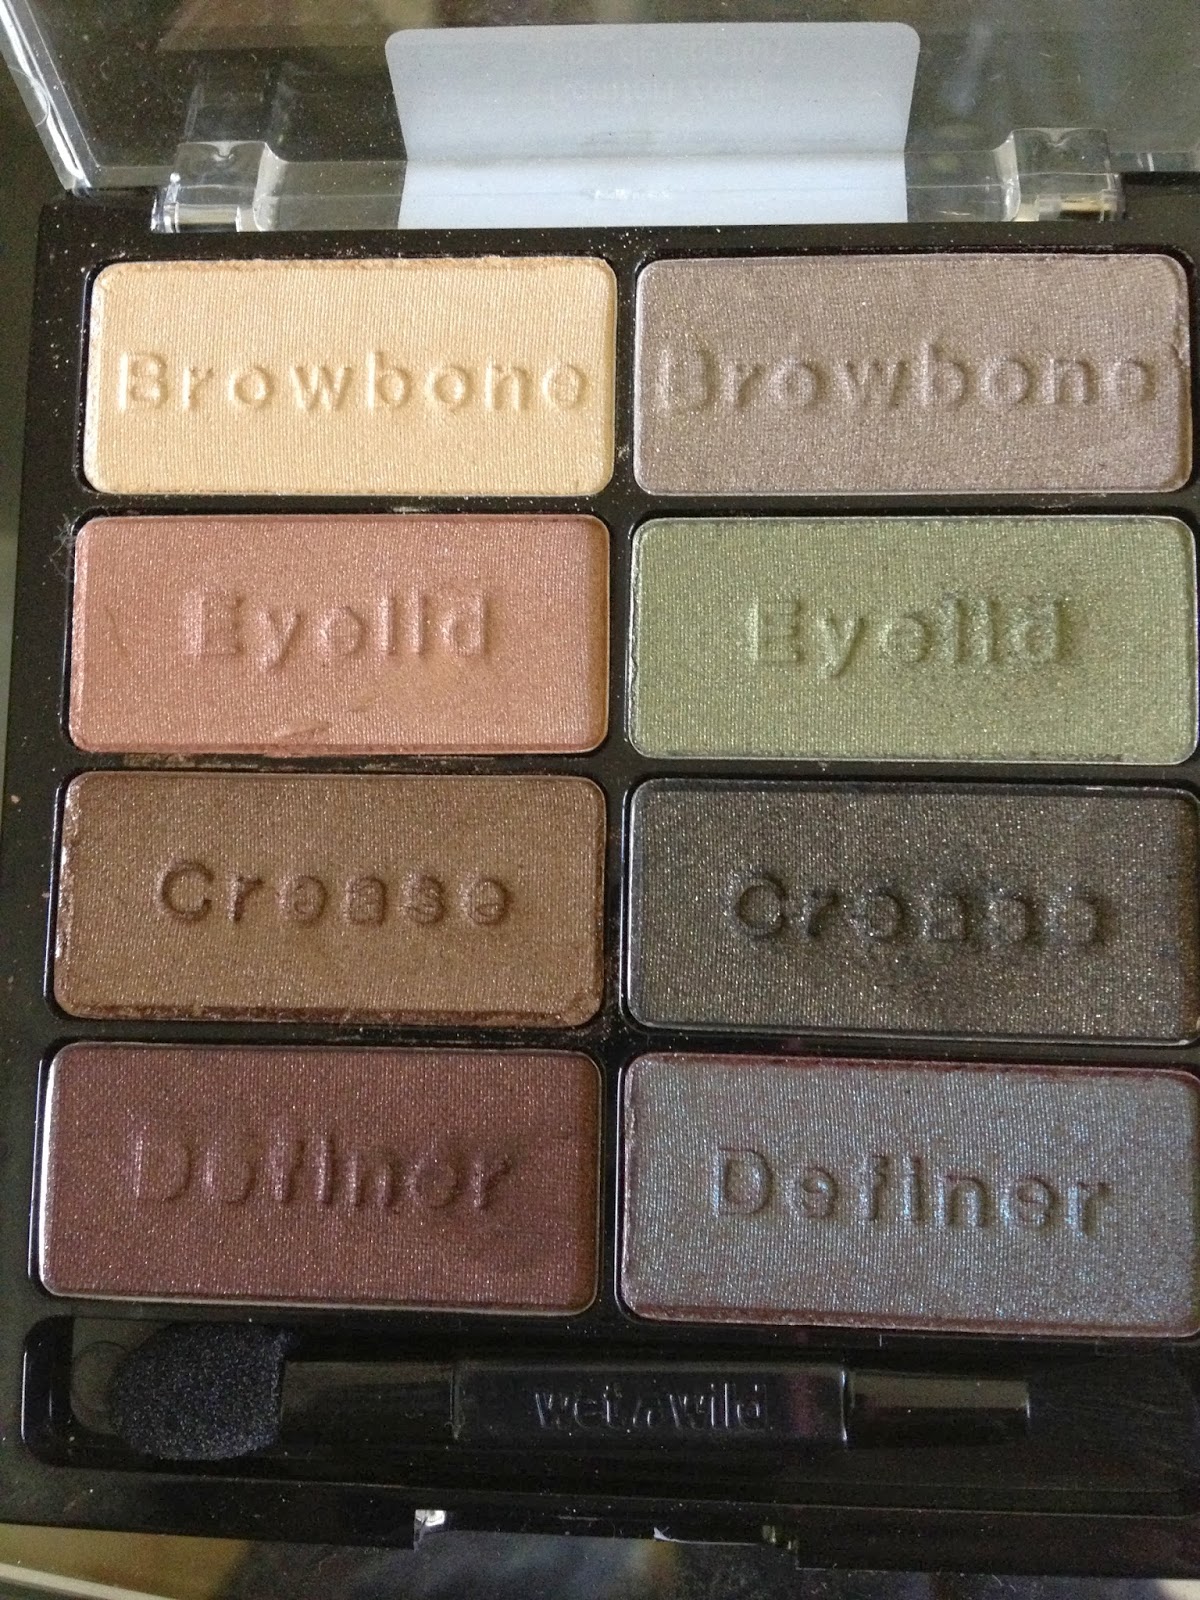
I don't know why on earth it took me so long to spend all of $5 on the Wet n Wild Color Icon Eyeshadow Palette in Comfort Zone.  Maybe it's because I have too much eyeshadow as it is, but when I finally tried this palette, I was blown away.  I can totally see what all the hype is about. 

This is what you get for $5:


 The eight shades that come in the palette are all stunning.  They allow you to create a more natural, everyday look but also give you the option to do a more intense smokey eye.  The colors are labeled "browbone," "eyelid," "crease," and "definer."  If you're a beginner or just have no idea what to do, use those labels as a guide.  The four colors on the left can be used for a more natural look, and the right side can be your dramatic shades.  While the labels can be helpful, don't feel obligated to use the colors just for those purposes.  You could really do ANYTHING with these colors.  I just love how the possibilities are endless, and this palette really allows you to access your creative side. 

Ok, now let's talk about the quality of these shadows.  Considering how this costs $5 for eight eyeshadows, you might just walk right by it at the drugstore and assume it's no good.  Wrong!!  Even though I've heard a lot of people talk about this, I was seriously blown away when I swatched these.  They are SO soft and so pigmented.  A little bit goes a long way with these.  If I didn't know what I was swatching, I'd think it was high-end eyeshadow.  Here's what the colors look like swatched:


I used the colors on the left of the palette (on the top of my hand here) for an easy, running errands on the weekend look last Saturday.  Here's what I got:


I achieved a very natural look.  If I wanted it to kick it up just slightly, I could have used more of that dark "definer" shade in my outer corner.  Here, I only used a tiny bit.  I focused more on the lid and the crease.  I also used the nice taupe crease color on an angled eyeliner brush on my lower lash line as my eyeliner (I used an eyeliner pencil on my top lashline).

So basically, the point of this post is to let everyone know about this amazing find!  I think everyone should own this product.  It's that good.  This is my first Wet n Wild product, but I would like to try some of their blushes, lipsticks, and bronzers eventually.  Oh and obviously, I'd be interested in trying some of their other eyeshadows. 

Stay tuned for part 2 of this post where I show you how you can use the colors on the right for a smokey look!  And as always, thanks so much for taking a few minutes out of your day to read this.

xoxo,

CC