Tuesday, November 1, 2016

Eyelash Extensions Experience


These days, eyelash extensions are huge.  Everyone is getting them, and everyone is doing them.  Who wouldn't want to wake up with beautiful, long, fluttery eyelashes and not have to use mascara?  While there are many pros to extensions, there are also cons.  And, truth be told, they're not for everyone.  I had been wanting to try them forever.  After doing extensive research and watching many YouTube videos, I decided to finally take the plunge.

I bought a Groupon (and yes, many people would tell you not to do this), but the place I bought it to seemed reputable.  It had good reviews, and her normal prices were pretty comparable to what others in the area charge.  I think what most beauty gurus will tell you is don't buy a Groupon just because it's a good deal--make sure you research the place and check their reviews ahead of time.  When I went to book my service, she was booked out for over 2 weeks.  From everything I read, I took this as a good sign--if you can get in right away, she might not be too experienced, and she might not have that many customers.

When I went in to have them done, I told her what I wanted--something on the more natural side, and something that would open up my eyes.  She gave me exactly what I wanted, and I was very happy with the end result.  It took about 1.5 hours.  I did have some discomfort, which I was not expecting at all--in everything I had read and watched, nobody had ever mentioned this.  In fact, all I ever heard was that it is relaxing, and you can't feel anything as the lashes are being applied.  The discomfort started shortly after she started applying the lashes.  It felt like the glue was really irritating my eyes.  My eyes really started to water, which made it a bit difficult for her to apply the lashes, but it was something I had absolutely no control over.  She was able to work through it though and mentioned that I was not the only person that had happened to, and that if I were to keep coming back to get the lashes refilled, my eyes would get used to it.  Once the procedure was done, the discomfort and watering (and red eyes) quickly faded, and I was back to normal in no time.

While I found it really convenient to wake up and essentially already have my mascara done, lash extensions are not maintenance free.  In fact, at times, they felt quite high maintenance.  I was told to not get them wet for 48 hours.  After that, I had to be careful when washing my face.  I could get them wet, but I had to be careful about it.  After getting out of the shower or washing my face, I used a clean spoolie to brush through the lashes in order to keep them separated and going in the right direction.  As time went on, this got harder and harder to do, and the lashes eventually got all clumped together and didn't want to separate.  Typically on a daily basis, I don't wear any makeup except mascara and eyebrow makeup.  There were, however, a couple occasions when I wanted to wear eyeshadow and liner.  I was able to do it, but the lashes made it much harder.  If you are someone who wears full on eye makeup every day, these might not be for you.

Eyelashes have a growth cycle, and dead lashes fall out on their own (just like the hair on our head).  Therefore, the extensions gradually shed with your own lashes.  I was a bit concerned when I noticed that some of mine started falling out the very next day.  I also noticed that when they fell out, they were in clumps.  What I had heard is that there should be a 1:1 ratio with the extensions to your natural lashes--there shouldn't be several lashes glued onto one.  I got one refill after 2 weeks.  After that, I got them removed after 4 weeks.  They still looked decent at that point, but they were definitely more sparse and natural-looking than I wanted.  At that point, I really missed just wearing mascara and being able to make it as dramatic as I wanted.  As they started to shed, I could see some of my natural lashes peaking through.  While I was relieved that they were still there, I was concerned that they appeared a bit shorter than they were prior to extensions.  That was when I had a small panic attack and scheduled an appointment to have them removed.

I contacted a different lady, one who specializes in extensions, to have them removed.  She noted right away that the extensions look very different than the ones she applies.  She uses Nova Lash, which is a very reputable and high-quality brand of lashes.  She also noticed right away that several lashes were glued onto one and warned me that I might have some lash damage.  Once they were all removed, I saw that she was right--I did have some damage.  It wasn't terrible; I had the same amount of lashes, they were just shorter than before.  I was sad but also relieved that the damage wasn't worse.  She said my lashes would return to normal in about a month.  I started right back up with using castor oil on my lashes at night.  I am happy to say that just one week later (after using castor oil every night), I've already seen an improvement.  They are almost back to where they were before extensions--thank god!

So, what did I take from this experience that I could pass along to you?  Here is what I learned:

1.  Do your research.  I already knew this, but I didn't do a good enough job here.  Do not take this lightly!  Though the place I went to had good reviews, she didn't have an overwhelming amount of reviews.  If I recall, there was only one picture of her work that someone had posted on Yelp.  My advice to you would be to find somewhere with A LOT of good reviews and pictures.  Also, the lady who took them off for me offered a free eyelash consultation, so try to find somewhere that will do that for you.  Ask them a lot of questions--do research so you know what kinds of questions to ask.

2.  I hinted at this in the first point, but don't go the cheapest route.  This is an investment.  I don't always believe that you get what you pay for, but it's true in the case of eyelash extensions.

3.  Extensions just aren't for everyone.  Are you willing to spend the money to have them applied then have them touched up every few weeks?  Think about your lifestyle and how you like to wear your makeup.  Think about if you're willing to put up with worrying about them (being careful not to sleep on them, taking extra time to be careful washing your face and combing them afterwards, etc).  I'm trying to figure out how much time the extensions really saved me.  Sure, I was able to skip mascara every day, but with all the maintenance (not to mention the hour it took me to get a refill, which you would need to do regularly every 2-3 weeks), I think the time saving aspect might have been a wash.

4.  You can have them professionally removed if you don't want to wait for them to all fall out.

5.  If they do ruin your lashes, castor oil can bring them back to life!  There are also products like Neulash which have been said to work miracles, but if the $6 castor oil option works for me, I'll take it.

Thank you for reading!  I hope this was helpful.  Please share your eyelash extension experiences with me!
 photo a4b29d75-8d29-42de-b0b5-5faa7f59f9d3_zpse4a2d21e.jpg

Friday, September 9, 2016

Benefit Gimme Brow New Shade

Benefit re-vamped their whole brow lineup over the summer.  They brought out some new products, re-packaged the existing ones, and they also added some new shades to a few of the existing products.  I while back, I mentioned that while everyone seemed to love their Gimme Brow, it only came in two colors, neither of which worked for me.  The light shade made my brows look grey, while the dark one made them look too black.  For at least a couple years, I've been wishing for an in-between shade in this line.  Lucky for me, Benefit made that happen.


Gimme Brow in new packaging

Gimme Brow now comes in 1 (light), 3 (medium), and 5 (dark).  Light and dark did not change--these were the two colors that existed before.  Medium was their new addition, which is described as "golden blonde to medium brown--warm."  You'll see in the swatch that it is a great neutral to warm shade that would work for a lot of people.


Shade 3 (medium)

I love how this gel has fibers in it to make your brows more full.  It really works well in that way.  It fills them in lightly, so for me, it's perfect if I'm not wearing any other makeup.  The hold it gives is pretty good as well.  It is buildable, too.  The pictures below will show naked brows, one layer of Gimme Brow, and two layers.  Full disclosure--my brows are freshly threaded, so they don't look as sparse here as they sometimes do when they're in desperate need of a waxing or threading.

Naked brow

One layer of Gimme Brow in shade 3

Two layers of Gimme Brow in shade 5

The only thing I don't like about this (besides the price) is that it's not completely waterproof.  While it claims to be water-resistant, it does tend to fade for me during an intense cardio workout (Pure Barre Platform, anyone??).  If I'm just sweating lightly and going about normal day-to-day business, the longevity is fine.

Thanks for reading!  I hope you give this a try if you're in the hunt for a new tinted brow gel.  
 photo a4b29d75-8d29-42de-b0b5-5faa7f59f9d3_zpse4a2d21e.jpg

Wednesday, August 31, 2016

Travelling Back 10 Years: Makeup I Wore In High School

One of my senior pictures taken in 2005!  It was the summer between my junior and senior year.

I am currently subscribed to over 70 YouTubers, but with an increasingly busy daily schedule, I'm pretty selective about the videos I choose to watch.  I was immediately intrigued by one of Kathleen Light's videos titled "Makeup I Wore In High School."  I watched the video and thought it was such a fun idea.  It inspired me to think back to what I wore in high school and see if those products are still around today!

Foundation
I don't think I started wearing foundation until about junior year in high school.  I can't remember what all I tried, but I remember using Almay Clear Complexion Makeup when I was a senior.  I used to love this stuff.  It's still around today, although they have changed the packaging and added a pump.  Side note: I also remember loving Almay Truly Lasting Color in college.  In fact, I'm intrigued to try it again...

Concealer
Sticking with the Almay trend, I remember using and liking Almay Clear Complexion Concealer.  It's also still around today.  I used this on blemishes, and I don't remember if I used concealer under my eyes at that point.

Blush
More Almay!  I used a pink blush from them in white packaging.  It looks like it's not around today.  I was also a fan of the CoverGirl Cheekers Blush (not sure which color).  It is still available today, and they've updated the packaging.

Eyeshadow
The CoverGirl Eye Enhancers 4 Kit Shadows take me way back to when I was about 12 or 13 years old.  It was the first makeup product my mom ever bought me.  It's still around today, and they've also updated the packaging.  Sadly, I don't remember the exact name of the quad I had, but it had a couple pink shades and a couple brown shades.  It's funny to think back--I remember at first not even knowing that you could mix the shades or that there was any way to incorporate multiple shades into one look,  Every day, I'd pick a different one out of the quad to wear.

Eyeliner
It was almost always black pencil eyeliner once I got to the point of wearing it.  I used the CoverGirl Perfect Point Plus liner and remember liking it.  I think I also tried a couple others, although I can't remember which ones.

Mascara
Yet another CoverGirl product... does anybody remember their Fantastic Lash (I think that's what it was called) in the red tube??  OH MY GOD.  That stuff was amazing!  Why do companies get rid of good products??  Anyway, it had a traditional mascara wand type (not a rubber one), and I used and enjoyed all the varieties (they had a regular, a waterproof, and a curved brush).  SO GOOD.  I would still be using it today if it was available :(.  I also dabbled in some Maybelline mascaras.  I liked their Sky High Curves one (another great product that got discontinued).  I'm sure there were others, but those are the only ones that stick out to me today.

Lips
I was a lip balm girl in high school.  I think I also had some CoverGirl lip glosses, but for the most part, it was various types of lip balms.

Thoughts 10 Years Later
Looking back now, the only thing I wish I had done differently was fill in my eyebrows.  I actually remember getting my makeup done at the Bobbi Brown counter one time, and they filled in my brows.  I immediately went into the bathroom in Nordstrom and wiped it off.  I wish I could go back in time and talk some sense into my teenage self.  I also didn't use any bronzer, and I don't think I even knew what highlighter was.  Looking back at my makeup routine, it was simple, I used products I liked, and for the most part, it worked.

Thank you so much for reading and travelling down memory lane with me!  I would love to hear what you used and loved years back.
 photo a4b29d75-8d29-42de-b0b5-5faa7f59f9d3_zpse4a2d21e.jpg

Monday, August 1, 2016

Hair Hack

By now, you've probably heard that coconut oil is a miracle beauty product (in addition to being useful in the kitchen!).  One of its many uses is as a leave-in conditioner for your hair,  I've done this before, and my favorite way to do it is to put a little bit on the ends of damp hair right before I blow dry it.  The key is to use A LITTLE BIT.  Well, last week I went a little overboard.  I ended up using way too much, and I brought it up to about my ear instead of just keeping it on the ends.  The result?  Stringy, greasy hair that looked like it hadn't been washed in a week.  I was so upset!  I typically only wash my hair twice a week, and with how much hair I have, washing it is a large undertaking.  I thought I'd have to wash it again, then I got an idea.  Fortunately, it worked.

All I did after blow drying my hair was use dry shampoo.  I put some on the roots as I normally do, and I sprayed it in the lengths of my hair as well.  It completely did the trick!  It absorbed all the greasiness, and my hair looked perfectly normal.  It's totally fine to put dry shampoo in the lengths of your hair--just make sure you rub it in really well so you don't see a white cast.  I found the best way to do this was to rub the hair in between my palms.  After doing this, I brushed it out to make sure it was evenly distributed.

So there you have it, a super random hair hack.  Hopefully you won't make the mistake I did of using too much oil, but if you do, give this a try!

Thank you for reading!
 photo a4b29d75-8d29-42de-b0b5-5faa7f59f9d3_zpse4a2d21e.jpg

Tuesday, July 19, 2016

I've Found My HG Lip Balm

Makeup junkies always like to talk about their "holy grail" products.  I try to save this term only for products that really deserve it.  Guys, I've found my lip balm.  I've truly found my holy grail lip balm.  And it's one that's made for men!


This tube of wonderful goodness to which am referring is Jack Black's Intense Therapy Lip Balm SPF 25.  There are five flavors to choose from, and I opted for the original mint and shea butter variety.

The product has a nice thickness to it (think Vaseline but a little thicker), and it's incredibly moisturizing.  Probably my favorite part about this stuff is that it stays on my lips for HOURS.  That never happens--I'm one of those who is compulsively applying lip balm 1000 times per day.  Depending on what you're eating or drinking, it can even withstand that.

The mint flavor is really nice.  It's not too overpowering like some other mint lip products I've tried (some are even so strong they've burned my eyes).  That does not happen with this.  It's also quite a bit thicker than the CO Bigelow Mentha Lip Shine and lasts quite a bit longer on the lips.  It has a nice cooling sensation (again, not overpowering) and feels great.  I also like how it's not TOO glossy.  The finish is almost like a satin-matte with just a little bit of something.  That probably has to do with the fact that this was made for men.  It makes your lips look beautifully healthy.

Long story short, this stuff is amazing.  I would highly recommend that you go pick up a tube immediately.

Thanks for reading!
 photo a4b29d75-8d29-42de-b0b5-5faa7f59f9d3_zpse4a2d21e.jpg

Thursday, June 30, 2016

Favorites: June 2016

Summer is officially here!  As the seasons change, so do my favorite things.  Here's a look into what I've been loving lately.


Skincare
I've been loving Cetaphil's Oil Control Moisturizer SPF 30.  I still get a bit oily after several hours, but it's much less greasy than the CeraVe moisturizer with SPF I had been using previously.  I always have blotting sheets in my purse, so any excess oil is easily taken care of.  It's a bit pricey for drugstore skincare, but it's the best daily moisturizer I've found yet.  And it comes highly recommended by dermatologists.

Makeup
Bare Minerals Original Foundation is the only foundation I've worn all summer.  I have purchased several of these over the last 10 years and have used it on and off.  Every time I start using it again, I forget why I stopped.  It just does something for my skin that no other foundation does.  It's completely undetectable and gives the illusion of "I have perfect skin" rather than "I'm wearing foundation."  I wear the shade Medium Tan.  It feels great on my skin.  It's pretty.  It works.  It also makes me a little bit nostalgic--every time I use it, I think back to my freshman year of college when I first discovered it.  Good times.

Lipstick-wise, I've been really into MAC's Lipstick in Please Me and Anastasia's Liquid Lipstick in Crush.  We all know that MAC lipsticks are fantastic, Please Me is (in my opinion) the perfect pink.  Crush is the first of Anastasia's liquid lipsticks I've tried, and I'm impressed.  I certainly did not need another pinky nude; however, I didn't have any in my collection that were in liquid format.  The color is beautiful, and it lasts all day through eating and drinking.

Left: ABH Liquid Lipstick in Crush
Right: MAC Lipstick in Please Me

I rediscovered a blush that I hadn't used in a while--ELF's Studio Blush in Pink Passion.  It's one of those blushes that might scare you at first glance, but it's much more wearable than it appears in the pan.  It gives the prettiest, freshest glow.  I wore it on my wedding day, so it is obviously a favorite of mine.  And like all ELF products, it's super affordable!

Perfume
I've found a combination I love--Victoria's Secret Coconut Passion Fragrance Mist combined with Bobbi Brown's Beach Perfume is dynamite.  It takes me to a happy place of being on a beach in Kauai.  I love both of these scents on their own, but they are even more of a delight when mixed together.


What have you been loving this summer?  Thanks so much for reading!

 photo a4b29d75-8d29-42de-b0b5-5faa7f59f9d3_zpse4a2d21e.jpg

Thursday, June 16, 2016

Beachy Waves for Summer

When it comes to hair, it's all about messy beachy waves this time of year.  This is one of my all time favorite hairstyles and one that I tend to rock even in the depths of winter.  After watching a video by MakeupbyTiffanyD on YouTube (click here to watch), I was inspired to try out a new (to me) technique.


Products, Tools, and Technique


While this can easily be achieved with a wand, I used my 1" Conair curling iron (mine is super old but still works great).  I always use some type of dry shampoo and/or texturizing spray on my roots and through the lengths of my hair to prep it and give it some grit. Garnier's Texture Tease is a great (and cheap!) option.  I did my curls the way I normally do (starting near the roots and leaving about an inch out at the ends).  Instead of curling every piece away from my face as I normally would, I curled the front pieces away but then alternated every other piece (one going away from my face, then one towards my face, etc).  I loved the result--this really did help to achieve more of a wave than a curl.  I also thought it added more volume and dimension and gave more of that messy, disheveled look I was after.  After letting my hair cool for a few minutes, I ran my fingers through the waves and pulled them apart/fluffed/tousled them.  I added a bit more texturizing spray for even more of an un-done look, then I finished off with some Flexible Control Hairspray by Garnier.

If you're looking for a way to get beachy waves, I'd recommend watching Tiffany's video and trying this technique.  You can always try it and do little things and tweak it to make it your style.  

Thanks for reading!
 photo a4b29d75-8d29-42de-b0b5-5faa7f59f9d3_zpse4a2d21e.jpg

Thursday, June 9, 2016

CeraVe Cleansing Cloths: Ultra Gentle??


I've been loyal to CeraVe skincare for quite some time.  While I'm not a skincare expert, I do know that many dermatologists like this brand, and I also know that fragrance does not belong in skincare.  It's hard to find makeup removing towelettes that are unscented (the only ones I've found so far are by the brand Simple).  Therefore, I was psyched when I saw these wipes at Target and couldn't wait to try them out.  I figured if they're by CeraVe, they have to be good, right?  Boy, was I wrong.

First of all, I detected a scent right away.  It wasn't the typical floral or fruity smell that wipes usually have.  It smelled like... whiskey.  No joke.  This was an  unwelcome surprise.

Then... I used it on my face.  I've never had a more painful experience with makeup removing wipes.  It appeared to remove my makeup pretty well, but it stung my skin (and my eyes!!).  Since I've been using Differin and Aczone for my acne, I thought maybe it was just that my skin had become more sensitive, and I thought maybe they would be ok to continue using, even if they stung.  A few days later, I used one to remove my liquid lipstick... and it stung my lips!  That has never happened before, and there is no way my lips would be affected by either of my prescription creams.  That was the final straw, and at that point, I rendered these wipes unsuitable for the face.

If you can't tell already, I really regret this purchase.  Not only did they cause pain, but they were expensive--$8 for one pack!  I don't understand how this went so wrong--they are highly rated on beautypedia.com.  Who knows, maybe I got a bad pack, but I'm not willing to spend another $8 to find out.  I would not consider these to be "Extra Gentle" as stated on the packaging.  I'm very sad that these were a total fail for me.  If you are brave enough to try them, I would be interested to hear about your experience.

Thank you for reading!
 photo a4b29d75-8d29-42de-b0b5-5faa7f59f9d3_zpse4a2d21e.jpg

Thursday, May 26, 2016

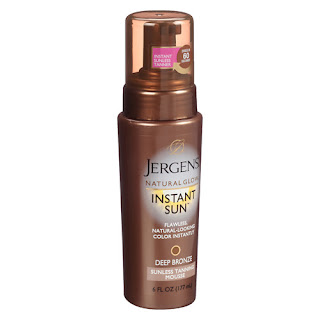
Jergens Instant Sun Sunless Tanning Mousse


Up until about a month ago, I had never tried a sunless tanning mousse.  Most of the ones I hear about are pretty pricey, so I was delighted when I found out that Jergens came out with one called Natural Glow Instant Sun Sunless Tanning Mousse (could the name be any longer?).  I purchased the Deep Bronze color.  I read several reviews prior to trying this product, and they all recommended to use a tanning mitt instead of bare hands.  The one I purchased was this one by St. Tropez.

How I Used It
I took a shower and exfoliated my whole body with my favorite scrub, Tree Hut's Shea Sugar Scrub.  I toweled off and did not apply any lotion prior to using the tanning mousse.  I thought this stuff was pretty easy to use, especially considering that I'd never used a tanning mousse.  I just used one to two pumps at a time on the mitt and applied it.  As you want to do with all tanning products, I was careful to apply it sparingly on my knees, elbows, knuckles, and feet.  The mousse has a bronze tint to it that works as a guide to help you see if you've missed any spots.

Drying Time and Scent
Jergens claims that this mousse dries in 60 seconds.  I think it takes more like a few minutes, which isn't too bad.  Just to be on the safe side, I waited about 10 minutes before dressing.  I wasn't going anywhere for the rest of the day, so I just put on some loose sweat pants and a t-shirt.  I would recommend wearing something loose-fitting--I can't imagine that putting skinny jeans on while this is still sticky would be very much fun.  Although it dries in minutes, it stays somewhat sticky for several hours.  It didn't bother me too much, but it's something to be aware of.  When I first applied it, I was surprised to find that it didn't have that smell that all self tanners have; it actually smelled pretty good.  Over the next few hours (and even the next day after I had showered), the self tanning smell reared its head.  It wasn't terrible though.

Results
I was very happy with the color I got from the mousse.  I could see results right away, and it continued to darken throughout the day.  The color lasted on me for close to a week, and it didn't get all weird and patchy when it faded.  I should mention that I did not put this on my face, and I don't think this is recommended for facial use.

Final Thoughts
I'm definitely a fan of this stuff.  It's reasonably priced, easy to find, easy to use, and the results are great.  Let me know if you give it a try!

 photo a4b29d75-8d29-42de-b0b5-5faa7f59f9d3_zpse4a2d21e.jpg

Sunday, May 8, 2016

Favorite Lip Liner/Lipstick Combos

I never used to be into lip liner--I thought it was too high maintenance.  I still don't use it every day, but I do love the effects it gives when I do wear it.  You can apply it all over before lipstick to make it last longer, or you can just line the edges after lipstick to smooth out the lines.

MAC Subculture Lip Pencil/MAC Blankety Lipstick

Left: MAC Subculture Liner
Right: MAC Blankety Lipstick


Urban Decay 24/7 Glide On Lip Pencil in Native/MAC Creme Cup Lipstick

Left: Urban Decay Liner in Native
Right: MAC Creme Cup Lipstick


L'Oreal Colour Riche Lip Liner in Forever Rose/MAC Please Me Lipstick

Left: L'Oreal Lip Liner in Forever Rose
Right: MAC Please Me Lipstick


Rimmel Exaggerate Lip Liner in East End Snob/Kat Von D Everlasting Liquid Lipstick in Lovesick


Left: Rimmel Lip Liner in East End Snob
Right: KVD Lipstick in Lovesick


Clearly, my favorites are nudes and pinks.  What are your favorite combos??

 photo a4b29d75-8d29-42de-b0b5-5faa7f59f9d3_zpse4a2d21e.jpg

Friday, April 22, 2016

New Discovered Use For Flat Foundation Brush


Chances are good that you have a flat foundation brush just like the Real Techniques Essential Foundation brush pictured above laying around somewhere in your house.  You might also be wondering what to use this brush for.  In my opinion, these have never been the greatest for applying foundation.  I like using them for undereye concealer.  As I was getting ready for an event a few minutes ago, I tried something new... and I can't wait to share it with you!

I used this brush for contouring.  For contour powder, I used NYX's Highlight and Contour Palette.  I dipped the Essential Foundation Brush into one of the contour powders and softly applied the contour line in circular motions.  I went into the hollows of my cheeks and on my forehead and jawline.  I even (and I have never done this in my entire life, but I thought hey, why not try it) contoured the sides of my nose.  I was blown away by how well this brush worked!  It applied the most perfect contour lines.  They weren't too sharp, nor were they too soft.  I did go over the lines with a fluffy powder brush and gently buff them out, but they didn't even look like they needed it.  This brush worked better than any other brush I've tried for contouring!  I think it would also work well to buff in a cream contour product.

If you try this out, and I hope you do, please let me know what you think!
 photo a4b29d75-8d29-42de-b0b5-5faa7f59f9d3_zpse4a2d21e.jpg

Friday, April 15, 2016

Makeup Removing Products 101

I've harped on the importance of removing your makeup prior to washing your face at least a few times on here.  I once read somewhere that washing your face without first removing your makeup is like taking a shower with your clothes on--it's an interesting analogy!  There are so many different makeup removers--and types of makeup removers--out on the market right now.  I thought it would be cool to do a rundown on some different varieties, my favorites in each category, and how I use them.


Oils/Balms
I like the quickness and ease of an oil or balm--it's one product that removes both your face and eye makeup and doesn't require any cotton balls, washcloths, etc.  They are made to melt down your makeup while your face is still dry, then you rinse them off and wash your face afterwards.

Balm vs. Oil: A balm is a solid version of an oil.  Other than that, they're pretty much the same, and it comes down to personal preference.  I prefer an oil--there's just something about digging my fingers into a balm that doesn't appeal to me.

Pros: They're quick and easy, and they also condition your skin and lashes.

Cons:  They tend to leave behind a mess in your sink.  It's nothing that won't come off when you clean your bathroom though.  It just won't be pretty to look at until it's cleaned.

Favorite: Clinique's Take The Day Off Cleansing Oil is my favorite of everything I've tried.  I love how it's non-scented too.  If you're looking for a balm, their Take The Day Off Cleansing Balm is pretty good too.

PS--Don't be alarmed if your vision gets a little cloudy after using a cleansing oil or balm.  It'll go away.  In my experience, the cloudiness was a lot worse with the Clinique balm than with their oil.

Wipes
Wipes are perhaps the least messy option of the bunch.  I always have them, although I don't normally use them to remove my makeup at night unless I'm traveling.  I keep them at my vanity and use them to clean my hands off as I put on my makeup, and I also keep them in my gym bag to either a) remove my face makeup before a workout if I'm wearing any or b) clean the sweat off my face after a workout.  If I'm using them for the latter purpose, I always follow up with a regular moisturizer with SPF or tinted moisturizer/BB cream type product.

Pros: This is a hassle-free, mess-free solution for makeup removal and are great to have on hand while doing your makeup.  They'r also great for travel.

Cons:  They can be expensive if you use them every day unless you buy them in bulk at Costco.  They can also be drying on your face.  Some do a decent job of removing non-waterproof mascara, but I like to pour some eye makeup remover on the wipes for my eye area if I'm using them for makeup removal.

Favorites:  
*Costco's Daily Facial Towelettes are nice and wet, so they'll get the job done.  And they're a great value.  They are lightly scented, but nothing crazy.
*Simple's Micellar Makeup Removing Wipes are also great.  I have seen them sold in 3 packs at Costco.  They have no scent.

Micellar Waters
These have been big in Europe for a while now.  I've only ever tried Simple's Micellar Cleansing Water.  I've never tried the ever so popular Bioderma that every beauty blogger on YouTube seems to love, so I don't know if it's really worth the hype.  Micellar water is intended to remove face and eye makeup.  I found the Simple one did accomplish that task, but I needed a couple cotton rounds to remove everything.  It also left my eye area feeling a little dry.  I've found that it works well  as the pre or post gym remedy I mentioned above with the facial wipes.  Since I always have wipes on hand, I don't know if I'll continue to repurchase the micellar water.

Pros: It can remove all your makeup as it claims, and it's a nice way to refresh your face if needed.

Cons:  It takes several cotton balls when used as a makeup remover, and it's doesn't offer the conditioning benefits (especially around the eyes) that an oil does.

Eye Makeup Removers
If you're looking for something specifically formulated for eye makeup, I'm a fan of the two phase kind that you shake first.  Though most of these claim to remove waterproof mascara, I prefer to use them for regular mascara.  For waterproof mascara, I prefer baby oil.

Pros:  These are good for cleaning up eyeliner or mascara mistakes when putting your makeup on.  They work well to remove regular eye makeup.

Cons:  The obvious downfall here is that you'll need something else to remove your face makeup.  Though they will remove waterproof mascara if you work hard enough, I've found that baby oil works better.

Favorites:  Neutrogena's Oil-Free Eye Makeup Remover is affordable and gets the job done.  I've also purchased the Equate and Up and Up brands, and they are even cheaper and work just as well.

I hope this was helpful.  Let me know what your favorite makeup removing products are!  Thank you for reading!
 photo a4b29d75-8d29-42de-b0b5-5faa7f59f9d3_zpse4a2d21e.jpg

Friday, April 1, 2016

Maybelline Better Skin Concealer

After running out of my Maybelline Fit Me Concealer, I was in the hunt for something new.  I decided to try their SuperStay Better Skin Concealer and hoped it would be as good (if not better than) the Fit Me.

What I Look For In Concealer
A professional makeup artist will tell you that you need two different concealers: one for under your eyes, and one to spot conceal.  Depending on what you are trying to accomplish, this may be true.  But for the average woman doing makeup on a daily basis without serious dark circles or discoloration, I think it's fine to use one product for both.  I look for a concealer that is a good match for my skin tone (one that is too light would only be appropriate for highlighting or under the eyes) and blends in quickly and easily.

Thoughts on Better Skin vs. Fit Me
*Both have a doe-foot applicator.

*The Fit Me formula is thinner and more liquidy.  The Better Skin formula is more gel-like.  I prefer the Better Skin formula, as I think it blends in more quickly and sets better (and lasts longer!).

*My shade in Fit Me is Medium.  When looking at the Better Skin concealers in store, they seemed to run pretty dark.  I opted for the shade Light/Medium, which is a pretty good match for me right now.

Light/Medium

*Better Skin is almost twice the price of Fit Me.  That being said, they are still both drugstore products with drugstore prices.  I have no problem paying $9.00 for Better Skin--it's still less than a third of the price of Urban Decay, NARS, or some other popular high end concealers.  You get almost exactly the same amount with each one--Fit Me is 0.23 fl oz, while Better Skin is 0.25 fl oz.

*Both are great to wear over foundation or on their own.  In the photo below, I am wearing no foundation--I just put the Better Skin concealer under my eyes and over some blemishes and areas of discoloration and set my whole face with MAC's Mineralize Skinfinish Natural powder in Medium Golden.  I also followed up with bronzer and blush.


Better Skin blends in well with a brush, a Beauty Blender, or your ring finger.  It's quick and easy and does the job.

I hope this post inspires you to give Better Skin a try!  Thank you for reading!

 photo a4b29d75-8d29-42de-b0b5-5faa7f59f9d3_zpse4a2d21e.jpg

Wednesday, March 16, 2016

New Brow Goodies

With so many new brow products on the market, it's hard to not be intrigued.  I recently picked up two new pencils and a clear brow gel to test out.


Anastasia Beverly Hills Brow Definer
This is a new release from the brand.  Similar to their Brow Wiz, this is a retractable pencil with a spoolie on the other end.  Unlike the skinny tip the Brow Wiz has, the Brow Definer has a larger, flatter, triangular-shaped tip.  If you are one who likes to lightly fill in sparse areas, the Brow Wiz would be the way to go.  However, if you're like me and go for a bold brow ever day, I think you'll love the Brow Definer.  Since it's bigger, it covers more area per swipe.  It's so much faster than the Brow Wiz!  I picked up the color Soft Brown and think it's perfect for me--it has just a bit more warmth than Medium Brown.  The formula is waxy and has good lasting power.

L'Oreal Brow Stylist Definer
Similar to the Brow Wiz or NYX's Micro Brow Pencil , L'Oreal's Brow Stylist Definer is a retractable pencil with a spoolie and has a very fine tip.  I already know I like both the Brow Wiz and Micro Brow Pencil, and I wanted to see how L'Oreal's version compares.  They are all very similar in packaging and quality.  Brow Wiz has the waxiest formula of all three, followed by the Micro Brow Pencil and the Brow Stylist Definer.  Brow Stylist Definer was, in my opinion, is the softest in texture and glides on more easily than the other two.  Despite the soft texture, its longevity is pretty decent.  I chose the color Brunette, which is almost the exact same shade as the Micro Brow in Ash Brown.  Despite the fact that I have almost black hair, I don't typically go for the darkest shade in brow products.  Brunette is a good color for me and isn't too warm or too cool.

L-R:  NYX Micro Brow in Ash Brown, L'Oreal Brow Stylist Definer in Brunette, ABH Brow Definer in Soft Brown

I also picked up L'Oreal's Brow Stylist Plumper Brow Gel in transparent to set my brows after using the pencils.  It's a good clear brow gel with decent hold (not the strongest by any means, but good enough).  The wand is on the smaller side, which is neither here nor there for a clear formula.  I'll need more time to decide if I like it more than NYX's Control Freak, but so far, so good.

Thank you for reading, and if you've picked up any new brow products recently, please share your thoughts with me!

 photo a4b29d75-8d29-42de-b0b5-5faa7f59f9d3_zpse4a2d21e.jpg

Saturday, March 5, 2016

Training Your Hair/Changing Your Part


Moving your part is a fun way to change around your look.  After 15+ years of parting my hair to the left, I decided it was time to change it up.  I'm not sure what exactly inspired me to do it, but I thought I'd try parting my hair down the middle to see how it looked on me.  Training my hair to part down the center has taken a lot of patience, but three months later, I think my hair has finally gotten the hang of it.  If you are looking for some tips on training your hair to part either on a different side or down the center, here are a few words of wisdom that may help you out.

Part It Right After You Shower
After you wash your hair and take it down from the towel, comb through it and immediately part it where you want it.  This will help your hair to dry in the right position.  You can use a rat tail comb to get an even part.  More often than not, I just use my pinky finger.

Direct The Heat From Your Blow Dryer
This is very important and is something I was doing wrong initially.  When you're trying to train your hair for a new part, DO NOT flip your head over to blow dry it!  Doing so makes it harder to get it to part back in the right spot and creates lots of flyaways at the front of your part.  Instead, point the nozzle of the dryer down and direct the heat downward from the front of the part.  Use your fingers to help smooth the hair down as you dry it.

Use Product To Tame Flyaways
I tried using hairspray, serum, and a few other products, but Big Sexy Hair's Big Boost styling cream is my favorite.  It provides light hold but is not shiny or heavy.  I found that the hairs at the front of my part wanted to go in every direction because it wasn't used to parting down the middle.  This stuff really helped to keep it under control.  Clear brow gel also works and is a great on-the-go solution since it's easy to keep in your purse.

Sleep With Bobby Pins
I got this very helpful tip from my hairdresser.  I would also keep them in my hair at home during the day or in the car (and I'd take them out before getting out of the car).  Not only does this help to direct the hair, but it also helps to keep the flyaways at bay.

Be Patient!
Successfully re-training your hair is not something that will happen overnight.  As I mentioned earlier, it took my hair about three months to learn the center part.  It requires extra maintenance, and you will also have more volume on one side than the other for a while.  But these little annoyances will all go away eventually, and it's worth it in the end.  I am loving my new center part and think I'll keep it for a long time.

I hope this was helpful, and please share your tips with me if you've changed your part!

 photo a4b29d75-8d29-42de-b0b5-5faa7f59f9d3_zpse4a2d21e.jpg

Saturday, February 27, 2016

No Foundation Pump? No Problem!

If you're like me, it drives you crazy when foundation doesn't come with a pump.  If it's packaged in a squeeze tube, that's fine, but the old glass bottle sans pump packaging is nothing short of annoying.  Fortunately, I've come across a couple solutions to these foundation dispensing problems.


Beautymp.com
This company, which can be found beautymp.com, sells pumps for many different foundations.  They usually have a 20% off coupon code on the top of their site.  I purchased the pump for Maybelline's Fit Me Matte and Poreless Foundation (which is a great drugstore foundation).  This is what the foundation looks like with the pump on it:


 The pump comes with a cap.  The quality is decent, and you can control how much product it dispenses by the amount of pressure you put on it.  It is not a perfect fit on the foundation, and you can tell in the last picture how it creates a bit of a mess on the side of the bottle.  Fortunately, though, it didn't make a mess inside my drawer.  The full price on this pump is $6.99.


MAC Foundation Pump
I wanted to compare Beautymp's pump to MAC's.  The MAC foundation pump is more easily accessible, as it can be found at MAC counters, MAC stores, and various sites online.  While it is made specifically for MAC foundations, I found in doing research that it also fits several other brands of foundation.  Here is what the Maybelline foundation looks like with the MAC pump on it:


This pump comes with a cap and also twists to lock.  Like the Beautymp pump, it has good control and allows you to pump out as much as you want.  It is also not a perfect fit on the bottle, but it's an improvement over the Beautymp one.  It covers more of the screw portion of the bottle and creates less of a mess.  I also like how it's black--this gives it a more sleek look (I know, this is a petty detail).  This pump retails for $10, and you can usually get free shipping when you order online.


Overall Thoughts
If you pay full price for the Beautymp pump, it ends up being around the same price as MAC's with shipping.  I have read many reviews on Beautymp's products, and it appears that some pumps fit the foundations they are meant to work with better than others.  Maybe they just missed the mark a bit on Maybelline Fit Me.  I do think their site is innovative, and it's a very cool concept.  They are definitely on my wavelength when it comes to the importance of foundation pumps.

If you plan to order the MAC pump for a non-MAC foundation, it's a good idea to do a little research beforehand to see if you can find any information about whether or not it is a good fit for your particular product.  If it fits, even if it's not perfect, I think this is a good way to go.  It's also worth mentioning that NARS sells a foundation pump for $6, and this is an option that may be worth exploring as well.

I hope this gave you some good ideas to improve your foundation's packaging.  While both of these options worked for me, I prefer MAC's pump for my Maybelline foundation.  Thank you for reading!  Please let me know if you try either of these and let me know how they work for you.

 photo a4b29d75-8d29-42de-b0b5-5faa7f59f9d3_zpse4a2d21e.jpg