Showing posts with label Makeup. Show all posts

Sunday, January 26, 2020

The Makeup Eraser

Background

I remember the days when I didn't think double cleansing was necessary.  I always wondered why the girls on YouTube would use something to remove all of their makeup prior to washing their faces.  I thought, what's the point if you're just going to wash your face anyway?  Can't I just remove my eye makeup, then wash my face, and I'll be good to go?  The answer is no... I was not good to go!

If you are like I used to be in this area, let me shed some light on the importance of the double cleanse.  If you use an eye makeup remover but then don't use a makeup remover on your face for your foundation, powder, etc prior to washing your face, you are not getting your skin clean!  All your cleanser is doing is taking off some (probably not all) of your face makeup.  Not only are you not cleaning your face, but most likely, remnants of your face makeup will be left behind to clog your pores and potentially cause acne.  It's like taking a shower with your clothes on.  When you double cleanse... i.e. use something to remove all of your makeup prior to washing your face, you will not only remove all of your makeup, but your cleanser will then be able to go in and actually do what it's supposed to do--clean your skin.  There are products out there claiming to be a one step makeup remover and cleanser, but I don't believe any one product out there can successfully remove your makeup and clean your skin in one step.  If you don't want to buy a separate product to remove your makeup, then at the very least, wash your face with your cleanser twice.  It might seem tedious and unnecessary, but I promise you that it is worth it... and 100% necessary.

For years now, cleanse-off oils have been my favorite method of removing my makeup.  My all-time favorite is this one by Clinique.  You massage it into dry skin, and it dissolves your makeup.  Add water and it emulsifies and rinses clean, then follow with cleanser.  So easy.  Makeup wipes are another quick and easy option, but I try to only use those when I travel.

Enter, Makeup Eraser

The Makeup Eraser has been around for several years now.  I had been tempted to buy it multiple times but never did until a couple months ago.  It retails for $20.  The Makeup Eraser is a very soft cloth that you run under warm water before using it on your face to remove all your makeup.  What convinced me to buy it was this awesome pack I saw at Costco for $20 but was on sale for $15.  For less than the price of one, you get two makeup removing cloths and a headband!  Side note--I love the headband and use it every day when I wash my face.
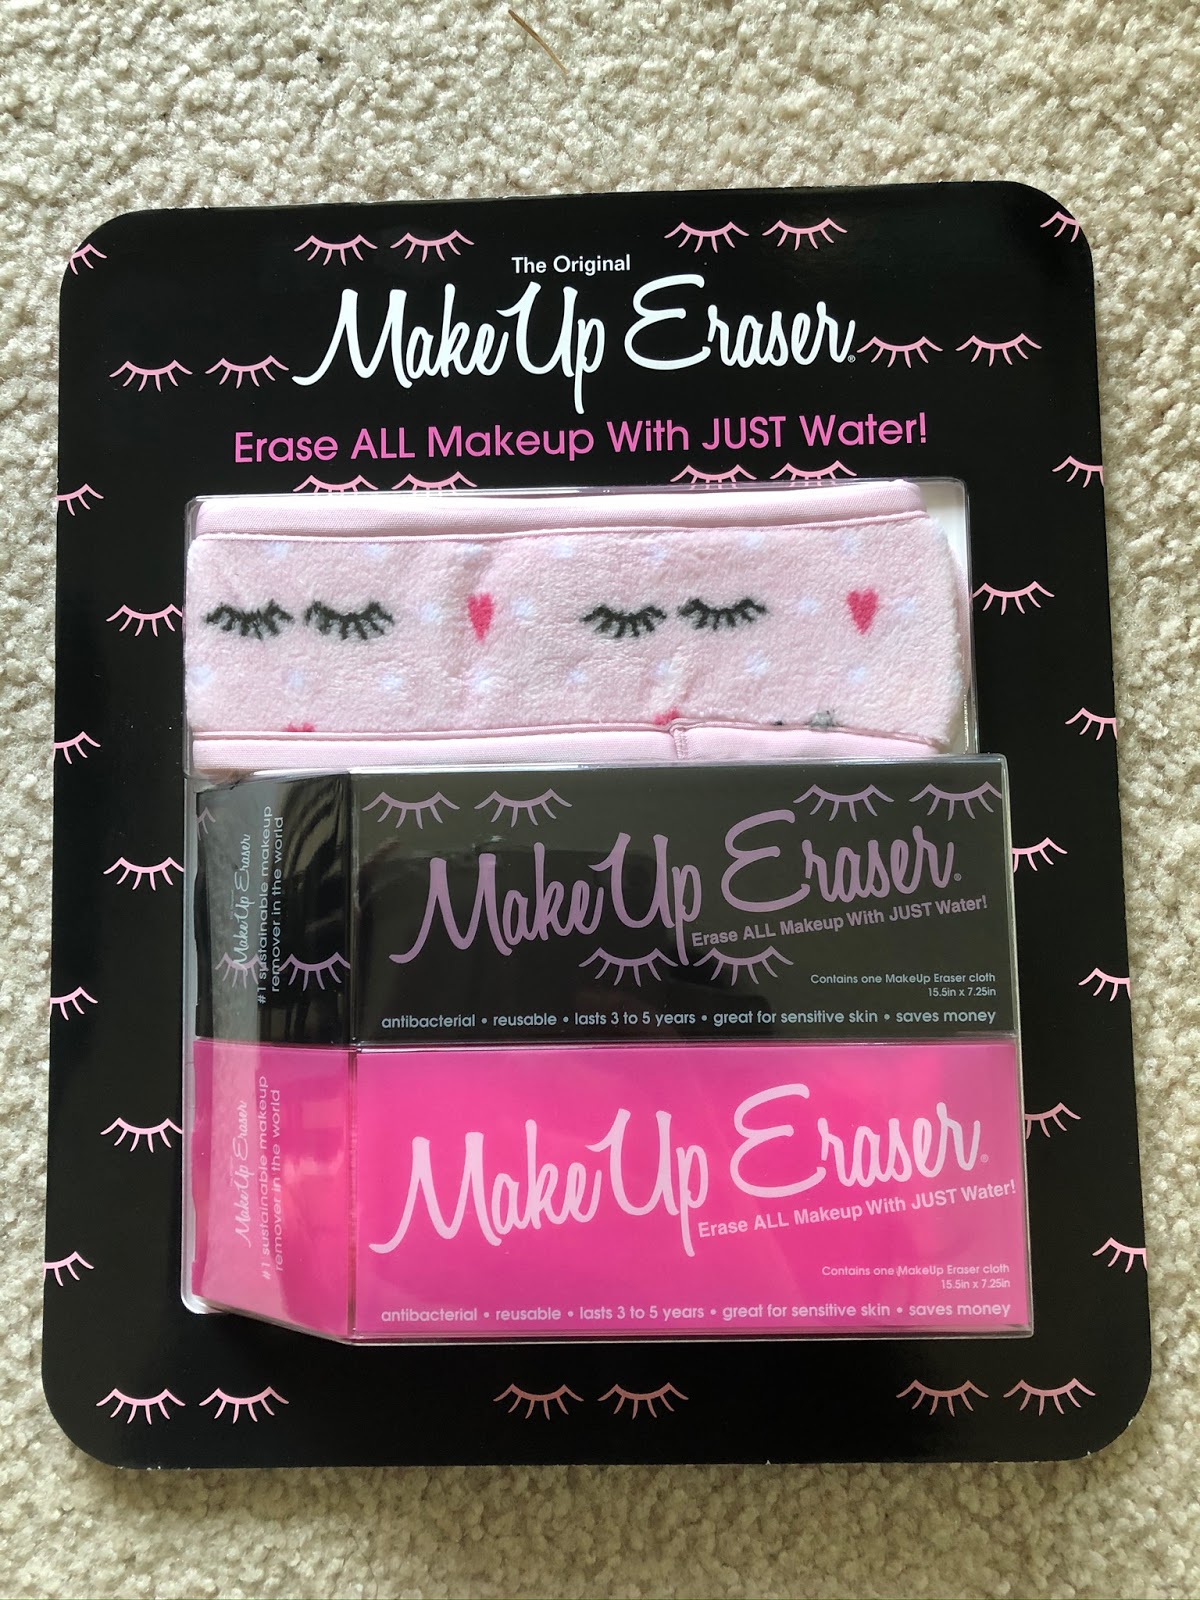
Found at Costco! Top to bottom: headband, pink makeup remover cloth, black makeup remover cloth

Back to the actual Makeup Eraser.  The instructions say to wash and dry it before first use, and it's safe to use fabric softener (just not bleach).  It's also safe to use with dryer sheets.  When you're ready to use it, run it under warm water and wring it out slightly.  Start with the side without the tag and gently use circular motions to remove your makeup.  For removing eye makeup, I use the same method I use with any other makeup removing product--I close my eyes and hold it on top of my eyelids and lashes for about 15-20 seconds with my ring fingers before gently rubbing in circular motions.  This allows some of the mascara/stubborn makeup to dissolve a little bit before you start rubbing so you don't put too much tension on your delicate eye area.  The instructions then say to flip the cloth to the back side, which has longer fibers, and massage it over your face to gently exfoliate.  Amazingly, this cloth works!  It really does take everything off.  A little more effort may be required when wearing heavy eye makeup, but it does work.  I have not tried this with waterproof mascara, but it claims to remove even that.  After use, rinse it, wring it out, and hang to dry.  It can be used for a week before you throw it in the washing machine. 

Tips/Final Thoughts

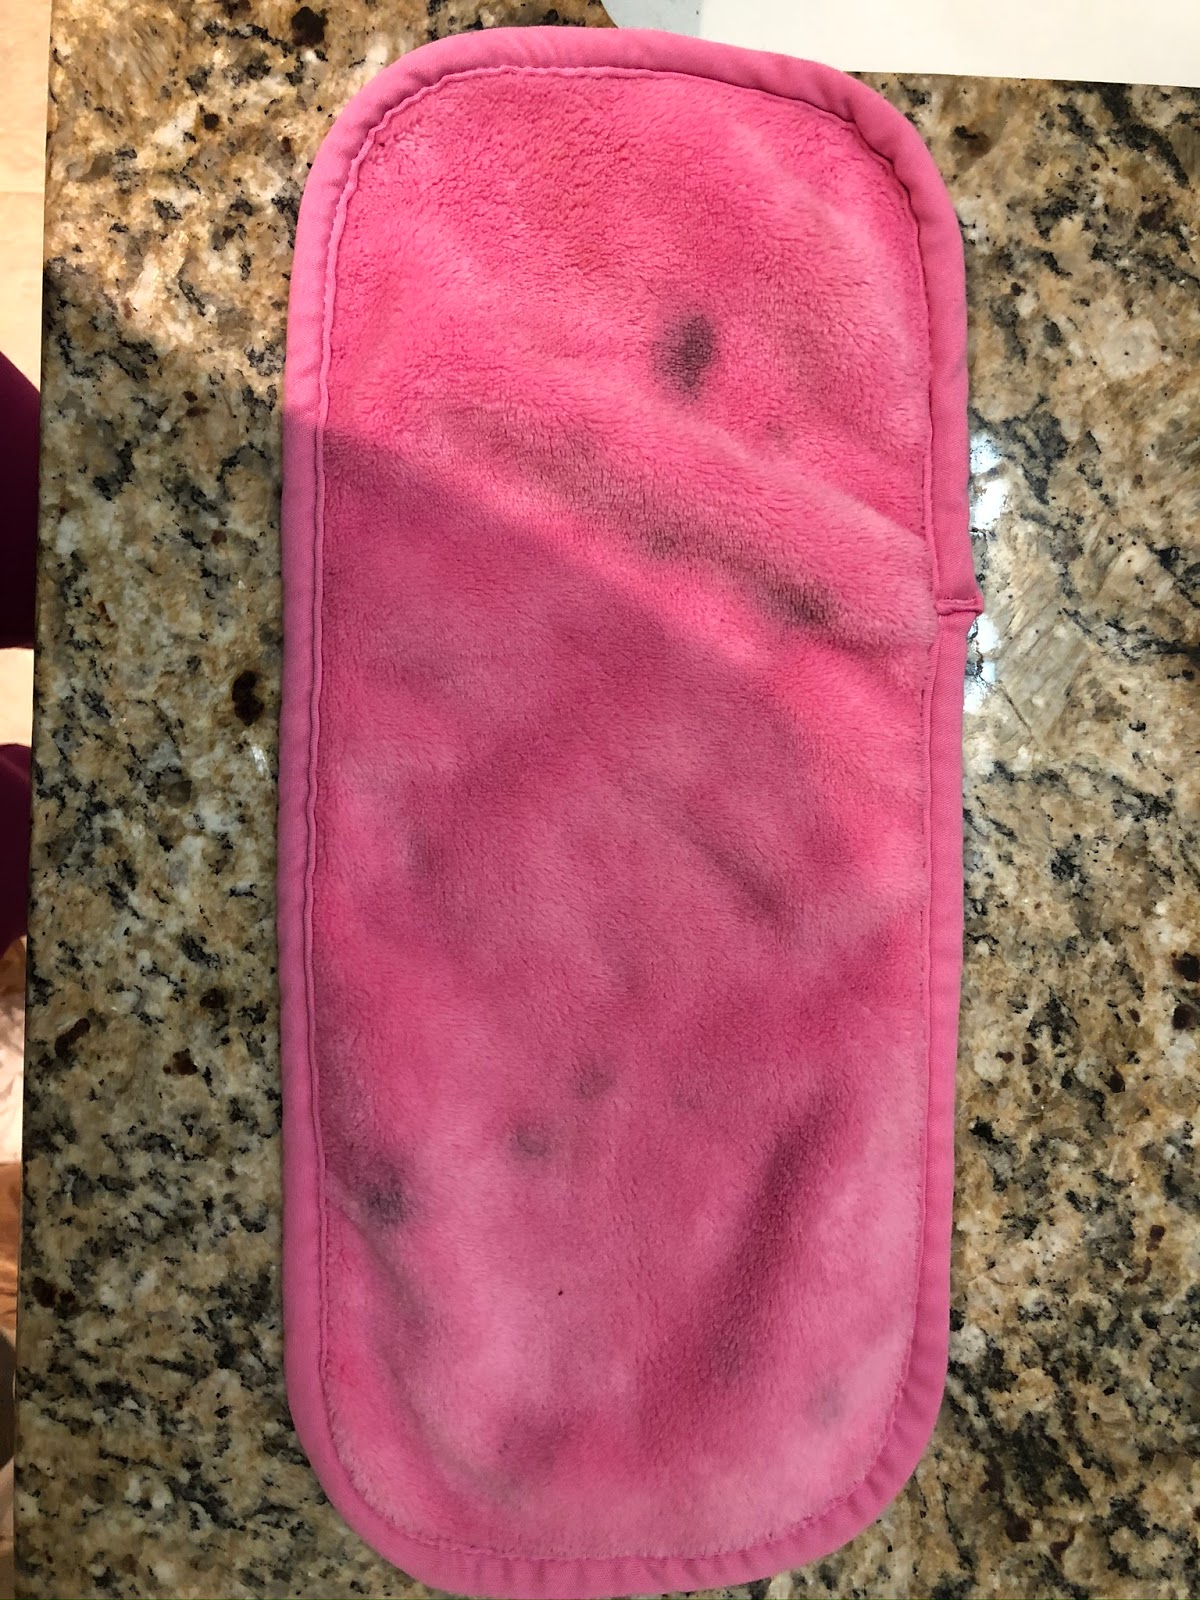
The Makeup Eraser is pretty easy to use, and I find it to be about as fast as using a cleanse-off oil.  It's mess-free and convenient... you only need the cloth and water, and your makeup magically disappears.  I also find that I don't need to wet the entire cloth--I can wet about half of it and use that one night, then wet the other half and use it the next night.  They wash up well in the washing machine.  My pink one left behind a little bit of black from my mascara, but it doesn't bother me because I know it's clean.  The black one is nice because any left behind mascara or eyeliner won't show up. 

After one wash: back side of the cloth washed completely clean

After one wash: front side of the cloth left behind some eye makeup


The cloths are very soft and feel good on your face.  The instructions state that they will perform better with warmer water, and I find this to be accurate.  They also work well when they are more saturated, so after running it under warm water, I wring it out only slightly.

I've read some recent negative reviews about the Makeup Eraser.  Almost all the negative ones say the cloth tugs on the skin too much.  Through trial and error, I've found that tugging can be minimized by keeping it more saturated and wringing it out less, by using hotter water (not scalding, but on the hot side of warm), and by using the method I mentioned for removing eye makeup.  It doesn't matter which type of product you use--if you don't hold it over your eyes for at least 15 seconds, your eye makeup won't have time to lift off of your eye, and more tugging to get the makeup off is almost inevitable.  You really don't need to use too much pressure to get the makeup off your face with this cloth.  If you press too hard, again, tugging is going to inadvertently happen.

If you're interested in trying this out and have a Costco membership, check there before paying full retail.  I like having two to switch out, but one would suffice.

Thank you for reading!  Let me know if you've tried the Makeup Eraser and what you think--just make sure to follow up with your facial cleanser!

xoxo,

 photo a4b29d75-8d29-42de-b0b5-5faa7f59f9d3_zpse4a2d21e.jpg

Friday, November 29, 2019

Bobbi Brown Extra Lip Tint: Bare Nude and Bare Pink

Tinted lip balms have been a staple in my makeup collection for quite some time.  What's not to love about them?  They're moisturizing, plus they add a little color.  They can often be easily applied without a mirror.  They're usually sheer enough that they will look good whether you're rocking a no-makeup look, a full face of makeup, and anything in between.  I'm here today to talk about Bobbi Brown's Extra Lip Tint in two shades-Bare Nude and Bare Pink.  Bare Pink is the iconic shade that has been around for a while.  Bare Nude is among a few shades that came out more recently.  The deal with these lip balms is they're one of those "self-adjusting" colors.  Basically, they go on very sheer and adjust in depth according to the natural pigment in your lips to give you your very own custom lip shade.

Left: Bare Pink
Right: Bare Nude


Bare Nude

Extra Lip Tint in Bare Nude

The Bare Nude shade appears much more opaque in the tube than it applies.  It's more of a coral/ orange-toned nude than a pink-toned nude.  On me, it ends up looking somewhere between coral and terracotta. 

Bare Pink

Extra Lip Tint in Bare Pink
Bare Pink

Unlike Bare Nude, Bare Pink appears very sheer (almost clear with a tinge of pink) in the tube.  I've seen many swatches of this shade on people, and I've also seen it used in many YouTube makeup tutorials.  On most people (at least from what I've seen), it translates to a beautiful light pink.  Because I have a lot of natural pigment to my lips, it translates to a deeper pink on me.


The Formula/Price/Pros/Cons

Top to Bottom: Bare lips, Bare Nude, Bare Pink


Both of the balms have a very luxurious consistency.  It's a thicker, gel/balm-like formula that just feels nice to apply.  They are not sticky at all and leave behind a nice layer of moisture and a good amount of shine.  Especially if you are wearing little to no makeup, they have the power to transform your look.  The color is sheer, but the effect makes your lips look so much more healthy and alive than if you had nothing on your lips at all.  The lasting power is decent for a lip balm.  If you are eating/drinking, you will need to reapply afterwards.  They have a very slight scent that remind me of graham crackers.  If you've tried MAC's Cleanse Off Oil, to me, the balms smell just like that but a little fainter.  The scent dissipates pretty quickly though after applying. 

The price on these is $34 apiece.  Yes, it's a bit steep for what it is.  Bobbi Brown runs sales on their website from time to time, so I like to wait until they go on sale to buy them.  I bought these a little while back when they ran a special deal on their site... it was basically two for the price of one. Speaking of sale, they are currently offering 25% off of everything on their website for Black Friday (through 11/30)!  They also sell them at some department stores and Sephora, so if you have a gift card to those places, those are great options as well.

Other than the price, I don't have any complaints.  I really like the way both of these shades look.  As I frequently say while teaching Pure Barre, for such a small change, they create a big impact. 

Thanks for stopping by!  If you've tried these, let me know your thoughts!

xoxo,
 photo a4b29d75-8d29-42de-b0b5-5faa7f59f9d3_zpse4a2d21e.jpg

Friday, November 22, 2019

Two New NYX Products I've Been Loving


Hi All!

I'm back with a quick review on a couple new products I recently purchased.  Both are from NYX's Cannabis Sativa Seed Oil line.


Brow Gel


The Bare With Me Cannabis Sativa Seed Oil Brow Setter (name long enough?) is a brow gel that can be used to prime and/or set your eyebrows in place.  I like to use it as a setter after filling my brows in.  I like the small size of the brush, which allows for control.  It goes on with a bit of a white tint, but don't worry if it makes your brows look weird and gray--it dries clear.  It has a bit of a drier texture, which I find works really well to shape my brows (kind of like how a drier mascara formula holds curl better).  I like to push up the hairs to give the appearance of more fullness, and I can easily do that with this product.  The hold is also really good, so they stay in their brushed-up shape.  It works well for me with any brow look I do (I'll go heavier on the brows if I'm wearing eye makeup and lighter if I'm not).  I have used and loved NYX's Control Freak Eyebrow Gel for many years, but this one has quickly taken its place!  The price on Ulta's website is $7.


Lip Conditioner


Next up is the Bare With Me Cannabis Sativa Seed Oil Lip Conditioner.  It's clear and doesn't have any scent that I can detect.  It feels like a cross between a lip balm and a moisturizing gloss when it goes on.  It's not too thick or too thin, and it's definitely not greasy, sticky, or weird.  It feels really comfortable right away and adds a bit of shine to your lips.  The shine dies down as it sinks in.  It sinks in pretty quickly but still leaves my lips feeling moisturized after it dries.  It's great to use at the beginning of your makeup routine under lipstick.  More often than not, I just wear this on its own, and it makes my lips look healthy.  It also works well when applied right before bed, first thing in the morning, during the day... really anytime.  The price on Ulta's website is $7.

Final Thoughts

I don't have anything bad to say about either of these products!  I now use them both daily and am really glad to have found them.  NYX products are frequently buy 2, get 1 free at Ulta, so I always try to wait until they go on sale to purchase them. 

Thanks for stopping by!  Let me know your thoughts if you try these!

xoxo,


 photo a4b29d75-8d29-42de-b0b5-5faa7f59f9d3_zpse4a2d21e.jpg

Friday, December 14, 2018

Beauty Blender Knockoffs I’ve Tried

Hi All!

If you’ve been with me for a while, you may recall a post I wrote a few years back comparing the Beauty Blender to the Real Techniques sponge.  When it first came out, Real Techniques’ sponge was widely regarded as a nearly identical to the Beauty Blender.  It was truly the first drugstore dupe of this iconic pink $20 sponge.  It’s now a few years later, and it seems that every drugstore brand has their own version of a Beauty Blender.  In total, I’ve tried four.  How do they compare?

Real Techniques Miracle Complexion Sponge--$4.99 to $5.99
If you want an in-depth review, visit my post from 2015.  In a nutshell, it feels and performs identical to the Beauty Blender in my opinion.  I love the flat edge, and I love how they now sell them in twin packs (you can still buy them individually as well).  I have several of these in my makeup artist kit, and I also always have one on hand for personal use.  A lot of beauty bloggers have commented that the Real Techniques sponge has changed and is no longer as good as it was originally; however, I have not noticed any differences. To me, it’s exactly the same as it was a few years ago.


L’Oreal Infallible Blend Artist Foundation Blender--$5.99 to $7.99
This is another great option.  I liked the color (pink) and thought it also felt nearly identical to the Beauty Blender.  When it's wet, it is larger than the Beauty Blender and the Real Techniques sponges.  The only downside here is that it doesn't have a flat edge like the Real Techniques.  Despite that minor shortcoming, I would buy it again.


E.L.F. Total Face Sponge--$4 to $5
Out of all these options, this one, in my opinion, is the least comparable to the Beauty Blender.  The material is different--it appears more porous, almost like an actual kitchen sponge.  It does become soft and squishy when you run it under water, but it feels noticeably different than the Beauty Blender or all other options mentioned in this post.  It's hard to explain--you would just have to try it to know what I mean!  It's not a bad sponge, but it did seem to absorb a little more product than the others.  It does, however, have that nice flat edge I like!


Flower Beauty Ultimate 3-in-1 Blending Sponge--$7 to $9
This one takes the cake for being the largest sponge.  After you submerge it in water, it gets huge!  It's very soft and has a very similar feel to the Beauty Blender.  I love the light purple color.  It does have a flat side, but it's smaller than that on the other sponges mentioned.  Because it's so large, it can be hard to work under the eyes or in other small areas.  The other edge to that sword is because it's so large, it quickly blends out foundation on large areas of the face, which is nice. 


Final Thoughts
I've come to the conclusion that there's no point in spending $20 on a Beauty Blender.  Even though none of these are identical to it, they are all suitable options that will allow you to achieve similar results.  Really, they all do the same thing the Beauty Blender does.  Although I like them all, the Real Techniques sponge remains my favorite. 

If you have tried any of these or any I haven't mentioned, I would be curious to know your thoughts!  As always, thank you for reading!  I truly appreciate it.

xoxo,
 photo a4b29d75-8d29-42de-b0b5-5faa7f59f9d3_zpse4a2d21e.jpg

Wednesday, October 3, 2018

Current Makeup Favorites--Fall 2018

It's time for a current edition of makeup favorites!


E.L.F. Instant Lift Brow Pencil (Neutral Brown)
I ran out of my Perfect Brow Pencil by Anastasia.  While I love that brow pencil and will probably go back to it at some point, I wanted to try something that was a) cheaper and b) retractable.  Enter, E.L.F. Instant Lift Brow Pencil!  The shade neutral brown is perfect for me.  It's not too warm or too cool, but as the name suggests, it is perfectly neutral.  It is a great texture that is easy to work with; it's a bit softer in texture than the Anastasia pencil but not so soft that you go overboard with the first couple strokes.  It's easily accessible (find it at Target, WalMart, Ulta, wherever E.L.F. is sold), and the best part is the price... $2!!

MAC Shape and Shade Brow Tint (Spiked)
I have one more brow product to share.  I had never tried an eyebrow pen but was intrigued after hearing so much on YouTube about the Shape and Shade Brow Tint from MAC.  I have absolutely been LOVING this thing!  The shade spiked is a good one for me--it's a bit warmer than the neutral brown shade mentioned above, but it still works great for me.  It is so easy to get a quick and natural look with the brush tip, but it can also be built up for a more dramatic brow.  Sometimes I'll even start by filling in my brows with the E.L.F. pencil (brows are always my first step in makeup), and if I end up doing a more dramatic eye look than anticipated and need bolder brows, I'll intensify the look with the pen.  The product has the brush tip pen on one side and a powder on the other.  I haven't used the powder very often, as I have found that the pen has pretty good longevity and doesn't really need to be set.  But nevertheless, it's nice to have the option.

L-R: E.L.F. Instant Lift in Neutral Brown, MAC Shape and Shade in Spiked (the brush-tip pen), and MAC Shape and Shade in Spiked (the powder)

Make Up For Ever Rouge Artist Natural Lipstick (N9 Copper Pink)
This lipstick (and shade) was the Sephora Beauty Insider birthday gift in 2014.  I absolutely loved the shade and used up the whole thing.  Earlier this year, I remembered how much I loved it and realized that I needed it back in my life!  The bummer about the Rouge Artist Natural Lipstick is that it is no longer sold in Sephora.  The only place I could find it was on Make Up For Ever's website, so I purchased it from there.  I'm so happy to have it again!  It's a gorgeous natural pink with a nice amount of shine.  The only other downside besides Sephora no longer carrying it is that it does have a bit of a scent that I don't really care for, but I'm willing to put up with it because the rest of it is awesome.

MUFE Rouge Artist Natural in N9 Copper Pink


ABH Soft Glam Eyeshadow Palette
I tried not to buy this... I really did.  I have so many options for neutral eyeshadows and had no need for this, but I decided to get it during the recent Sephora sale.  I had never tried any of Anastasia's shadows but have heard consistently good reviews.  Her Soft Glam palette does not disappoint.  The shadows have a great texture and awesome pigmentation.  I love the warm neutral shades.  Most of all, I love that the palette includes everything I need: a brow bone/inner corner highlight, a transition color, and a black.  It also has a nice variety of brown shades and some beautiful pink/plum shades.  It also comes with a dual-ended brush, which is pretty decent.  There are plenty of tutorials on YouTube and swatches online (that would look better than mine) if you are looking for them!

Bare Minerals Original Foundation (Neutral Medium 15)
This has been a favorite on and off for many years.  I've noticed that a lot of YouTubers are re-incorporating Bare Minerals' Original Foundation into their makeup routines.  The shade Neutral Medium works perfectly for me when I have a tan in the summer.  I have had the wrong shade of this product in the past, so it hasn't always looked the best on me.  When you have it in the right shade, it looks so beautiful and natural on the skin.  It truly does look like your skin is perfect and not like you have makeup on.  One of my favorite traits about this foundation is that it's very lightweight and doesn't feel like makeup.  It's also not drying like some powder foundations can be.  If you've used this and haven't been impressed with it, make sure that you a) have the right shade and b) are using a good brush with it.  I've been using their Beautiful Finish Face Brush and love the way the foundation looks and applies with it.

Winged Eyeliner
My final favorite is winged liner in general.  I go through eyeliner and no eyeliner phases.  I mentioned my love for I Dream of Jeannie in my previous post, and my marathon of watching Jeannie episodes over the summer still has me in love with winged eyeliner.


Thank you for reading!  I hope your fall is going well so far, and please let me know what your current favorite products are!

xoxo,
 photo a4b29d75-8d29-42de-b0b5-5faa7f59f9d3_zpse4a2d21e.jpg

Friday, August 24, 2018

"I Dream of Jeannie" Inspired Makeup

I may only be 30 years old, but I'm an old soul at heart.  One of my favorite (quite possibly my #1 favorite) TV shows is I Dream of Jeannie.  You might have just made the connection--my blog, "I Dream of Makeup," is named after this show.  When I was a kid, my brother and I used to watch Nick at Nite.  Jeannie was one of the shows regularly on that channel, as well as other classics such as I Love Lucy and Bewitched.  I loved them all, but Jeannie was always my favorite.  I loved Jeannie and Tony and their budding romance.  I loved her tricks, her bottle, her pink harem outfit, her "regular" clothes that she'd blink into, and it was no secret that she was beautiful.  Even at a young age, I was in love with the 60s clothes, hair, and makeup, and that still holds true today.

This summer, I re-watched the entire series, and it was just as funny and magical as I remember it being.  I was inspired to recreate Jeannie's makeup.  I noticed that throughout the series, her look changed.  Her iconic winged eyeliner (and a classic trait of 60s makeup) was there from the very first episode, but during the first season, it looked to me like she wore very little shadow on the eyes with a pretty clean bottom lashline.  In seasons 2 and 3, she wore more eyeshadow with more definition on the bottom lashline, and seasons 4 and 5, she wore the shadow a bit heavier in a cool-toned steel gray.  Her lip color changed throughout the series as well; it had more of an orange tone at the start of the series and gradually transitioned to more of a pink nude (my favorite).  The inspo for the look I created was the last two seasons, as that is the look that comes to mind when I think of Jeannie.


Products Used

Eyes
-Milani Eye Primer
-LORAC Pro Palette: Cream (all over), Taupe (crease/transition shade and also used to soften bottom lashline), Sable (crease and used to start building depth on outer portion of eye to create the winged/lifted look), Espresso (layered on top of Sable to build the depth and accentuate the winged shape more and also used on bottom lashline) Slate (lid into crease), Black (winged liner)
-The Balm Mary Lou Manizer highlighter for brow bone and inner corner
-L'Oreal Voluminous mascara
-Ardell Wispies false lashes

Lips
-Charlotte Tilbury Lip Cheat in Pillow Talk
-Bare Minerals Gen Nude Liquid Lipstick in Swag

The great thing about 60s makeup is that it's still very relevant and "in" today.  I don't ever see winged eyeliner going out of style.  I love how classic and glamorous it is.  Typically when I do a winged liner, I wear little or no eyeshadow--I like to let the liner shine on its own.  However, I will admit that it was a lot of fun to go all out with the shadow and channel my inner Jeannie.  Obviously, I had to wear a pink top too so I could get the full experience.

As always, thank you for reading!  I hope you try this out if 1) you're looking to be Jeannie for Halloween 2) you want to look special for an evening out 3) if you want to--you really don't need a reason!

xoxo,
 photo a4b29d75-8d29-42de-b0b5-5faa7f59f9d3_zpse4a2d21e.jpg

Sunday, June 3, 2018

Bridal Makeup Tips

Hi All!

Last weekend, I had the great privilege of being matron of honor at my sister-in-law's wedding.  It was such a beautiful wedding, and I had a fun day hanging with the girls and getting ready.  I did my own makeup but had my hair done.  With wedding season in full swing, I thought it would be a good time to share my tips on bridal makeup.  These tips work well for brides and bridesmaids but are also great for wedding guests or any special events where you know you'll be in lots of pictures and want to look your best!

Getting ready with my beautiful sister bride!


Get Your Skin In Top Shape
In the weeks leading up to your event, take extra measures to get your skin in tip-top shape.  I got a facial about a week before her wedding to take care of any blemishes/texture issues I was having.  A couple days before the wedding, I used a facial razor (I've posted about these before--I use the Tinkle razors) all over my face to get rid of any hair/peach fuzz.  This will provide a smooth canvas for your makeup to go on!  And it'll make your skin feel super soft.  I also got my eyebrows threaded a few days before the wedding.

Stay Away From SPF
Makeup or facial moisturizers with SPF in them will cause flashback/white cast in photography.  Stay away from these for a wedding or special event!

Double Check Your Foundation Color
As many brides or bridesmaids do, I got a spray tan a couple days before the wedding.  If you do this, make sure you double and triple check the color of the foundation you plan to use to make sure it matches your neck and chest.  Nobody needs that horrible line of demarcation!

Use Primer and Setting Spray... and Go Big or Go Home
I don't use primer on a daily basis but would never dream of skipping it for a special event.  Setting spray is also a crucial element to keep your makeup lasting through the night.  One thing to also keep in mind is that in photos, you will look like you're wearing less makeup than you actually are.  For that reason, you'll want to go a little heavier with everything than you think you should.  Also, unless you have lash extensions, definitely go for false lashes.  They will make a HUGE difference in pictures!  Lipstick is a bit tricky... you want it to last, but liquid lipsticks can sometimes be very drying and uncomfortable.  My best tip is to have a bridesmaid hold onto your lip color so you can touch up throughout the reception as needed.  I will say that I was a big fan of the YSL lip color I wore.  It stayed on pretty well but wasn’t drying, and it was very easy to touch up.

Don't Try Something New/Something That's Not You
Your wedding day is not the time to experiment or go with something bold if that's not you.  The best look for a bride is something that allows her to still look like herself.  Also remember that pictures of your wedding will be around forever, so you want something timeless and beautiful.

I hope these tips were helpful!  If you're curious about the products I wore, please see the list below.  Items are listed in the order I used them:

Primer: Bobbi Brown Vitamin Enriched Face Base and Bobbi Brown Eye Cream (to prep under eye area)
Eyeshadow: Milani Eye Primer, MAC Eyeshadows: Blanc Type, Soft Brown, Mulch, Embark
Eyeliner: L'Oreal Gel Eyeliner in Black
Mascara: Essence Lash Princess
False Lashes: Eyelure/Vegas Nay Bronze
Foundation: Bobbi Brown Stick Foundation 4.5 Warm Natural
Corrector: Bobbi Brown Corrector in Light Peach
Concealer: Bobbi Brown Full Cover Concealer in Beige and Natural Tan (mixed to create perfect shade)
Contour: Bobbi Brown Stick Foundation 9 Chestnut
Powder: Bobbi Brown Nude Finish Illuminating Setting Powder in Nude
Bronzer: Bobbi Brown Illuminating Bronzer in Bali Brown
Blush: NARS Orgasm
Eyebrows: Anastasia Perfect Brow Pencil in Medium Brown, Bobbi Brown Eyeshadow in Mahogany, NYX Control Freak Brow Gel
Setting Spray: Urban Decay Chill
Highlighter: The Balm Mary-Lou Manizer
Lips: Bobbi Brown Lip Pencil in Pink Mauve and YSL Tatouage Couture Liquid Matte Lip Stain in 25 Beige Secret

xoxo,
 photo a4b29d75-8d29-42de-b0b5-5faa7f59f9d3_zpse4a2d21e.jpg

Sunday, May 20, 2018

Lash Lift: A Perm for Eyelashes!?

Hi All,

Happy Sunday!  I'm coming at you today with a summary of my lash lift experience.  In case you haven't heard about this or don't know what it is, a lash lift is basically a perm for your eyelashes.  The spa I go to for facials started offering them in January at a special introductory rate, so I thought it would be a great time to try this out.

Top: Before lash lift
Bottom: After procedure


What Is the Appointment Like?
The appointment took about 40 mins, and I found it to be very relaxing.  For the record, most people find eyelash extension appointments to be very relaxing--so much so that they are able to fall asleep while the lashes are being applied.  If you caught  my post from 2016, you'll know that I did not have this experience because the glue stung my eyes and got into my sinuses, and it was actually very uncomfortable.  Back to the lash lift experience, I did fall asleep during the appointment.  My understanding is that it's similar to getting a perm on your head; she wrapped my eyelashes around a rod and painted on some type of perming solution.  It sounds scary, but the solution was very gentle.  I have extremely sensitive eyes and couldn't feel a thing.  Once she removed the rod, I looked in the mirror, and voila!  My eyelashes looked perfectly curled.

How Much Does It Cost?
This will vary depending on where you live.  Typically though, it is a bit expensive for what it is (of course this is all relative).  My spa charges $85, but I got it done for $65 when they had their introductory rate.

How Long Will It Last?
Similar to eyelash extensions, the life of the perm will be different for everyone.  We all have different hair growth cycles.  Mine lasted a good eight weeks.  I had a preconceived notion that the curl would gradually relax as weeks went by, but that didn't happen.  Instead, it was similar to eyelash extension shedding where lashes naturally fall out and grow back.  The shedding for me happened around the eight week mark.  A curled lash would fall out and be replaced by one of my regular, natural straight lashes.  This continued for a few weeks until all my permed lashes fell out, and I was back to my regular, sad, boring straight lashes.

Who Should Get a Lash Lift?
If you have straight lashes or even lashes that naturally point downwards, this might be something you would enjoy.  If you already have beautiful, naturally curled eyelashes, then 1) I am jealous and 2) you don't need this--save your money!

Final Thoughts
I really enjoyed having the lash lift.  Usually if I'm leaving the house without any makeup, I will still curl my eyelashes because they naturally point straight forward, and curling them would help to give my eyes a lifted look.  The lashes looked great with mascara on them, but I found myself hardly ever reaching for it, as they looked so good bare.  My lashes are naturally dark, but if yours are light, you could consider getting a lash tint in addition to the lift.  Not having to use a curler at all was such a breath of fresh air.  It was especially nice for teaching Pure Barre at 6 AM and waking up with already curled lashes! 

Though I loved it having the lash lift, this is not something I will keep up with on a regular basis, as I just can't justify the cost for something that can be achieved with an eyelash curler.  It is something, though, that I might consider getting again in the future.  For example, it might be nice to have if I go on a long vacation at some point where I won't be wearing a lot of makeup. 

Anyway, that's it!  Please let me know if you have any questions.  I would love to hear about your lash lift experience as well!

xoxo,

 photo a4b29d75-8d29-42de-b0b5-5faa7f59f9d3_zpse4a2d21e.jpg

Wednesday, December 13, 2017

Bobbi Brown Long-Wear Cream Shadow Sticks

Hi Makeup Lovers!

I'm here today to share my thoughts on the Bobbi Brown Long-Wear Cream Shadow Sticks.  A few years ago, I had one of her Long Wear Cream Shadows in a pot.  I thought that product was just ok--it tended to crease on me about halfway through the day.  The long-wear shadow sticks are a different story.  The formula seems to be improved over the pot form--these stay on all day and do not crease on me.  Plus, there's just something so easy and convenient about using products in stick form (even though I always use my fingers to blend after drawing it on).


Over the last few months, I've acquired three and a half (three full size and one sample size) of these and have been wearing them a ton!  Below, you'll find my thoughts on the shades I own.

Vanilla
Vanilla is a light matte vanilla (duh) color.  Though it's one of the more boring shades, it's one of my favorites, and it's the one I reach for the most.  It's great to use from lashline all the way up to the brow and makes the perfect base for layering underneath other long wear shadow sticks or powders.  Whether or not you buy this particular product, everyone needs to own some type of shadow or base in this color.  For a very simple eye, I'll use Vanilla all over with a light, neutral shade in the crease, mascara, sometimes liner, and that's it!  On days when I don't want to wear any eyeshadow, I'll just use this under the brow.  It makes the perfect brow highlight.

Sand Dune
Sand Dune is a beautiful warm nude shade.  This is great to apply from the lashline into the crease.  For the simplest eye, this can be worn alone.  It's a great warm neutral base underneath shadows.

Nude Beach
Nude Beach has a mauve shift and is more of a cool-toned neutral.  This one is similar to Sand Dune in that it makes a nice shadow from lashline into the crease either on its own or underneath shadows--it's just a more cool-toned option.  I do like this one, but I probably wear it the last out of all the cream shadow sticks I own because I'm typically more drawn to warmer shades.  However, I will be experimenting more to find a combo of shadows I enjoy wearing over this.

Golden Bronze
Golden Bronze is just that--it's a golden bronze.  This shade is stunning.  I said Vanilla was one of my favorites.  Golden Bronze is absolutely my other favorite.  I like to put this on my lid and into the crease, and I also love putting this on my lower lashline.  It looks beautiful on its own, and you can layer it under shadow for even more dimension.  Usually though, this is my one-stop shop if I'm wearing it.

L-R: Vanilla, Sand Dune, Nude Beach, Golden Bronze


Overall, I think these cream shadow sticks are phenomenal and have become go-to eye products for me.  Give them a try--you won't be disappointed!

xoxo,

 photo a4b29d75-8d29-42de-b0b5-5faa7f59f9d3_zpse4a2d21e.jpg

Monday, August 14, 2017

Foundation Stick Comparison: Bobbi Brown vs. Hourglass

I love the convenience and the idea of a stick foundation.  It's easy to travel with, you don't have to worry about it spilling and making a mess, and it can easily double as a concealer.  I currently have the Bobbi Brown Skin Foundation Stick in my collection in the shade 4.5 Warm Natural.  Last week, I received a sample of the Hourglass Seamless Foundation Stick in my Play by Sephora subscription box in the shade Beige.  I was intrigued to see how the two compared since Bobbi's was the only one I had ever tried.

No face makeup
Left (bangs side): BB Skin Foundation Stick in 4.5
Right: Hourglass Vanish Seamless Finish Foundation Stick in Beige
Foundation with loose setting powder, bronzer, and blush because I don't like to look dead
Top: BB
Bottom: Hourglass 
Here is what I noticed:

Shade
As you can see from the last picture, the shades 4.5 in BB and Beige in Hourglass are almost identical.  I also did half of my face with BB and half with Hourglass, and I couldn't tell any difference in either indoor or outdoor lighting.

Texture/Staying Power/Blendability
While the Bobbi Brown stick has a nice texture, the Hourglass variety is noticeably creamier and easier to blend.  The finish it provides is a bit more dewy versus what I get with the Bobbi Brown.  They both provided great coverage.  They both hold up well throughout the day, and neither of them seem to make my skin greasy after all day wear (keep in mind, however, that my skin is normal to dry).  Speaking of having normal to dry skin, neither of these foundations cling to dry patches or accentuate any dryness.  My preferred method of blending stick foundations is to use my fingers.  I think the warmth from my skin helps to blend stick foundations better than a brush or damp sponge.  When using a stick foundation, I don't typically use a concealer--I just blend the foundation under my eyes.  That is what I did in these photos.  I've mentioned before that the light and bright under eyes is not a good look for me, so I like to use something that matches my skin for that area.

Price
Perhaps the only drawback I can think of for both of these is the price.  Bobbi Brown's is $46 for 0.31 oz, and Hourglass's is $46 for 0.25 oz.  They are both high end brands, so a high price tag on these items is to be expected, but $46 is still more than I care to pay for a foundation (I purchased Bobbi Brown's during her friends and family sale in November when it was 20% off).

Final Thoughts
These stick foundations are very similar, and I love them both.  When looking at purchasing one over the other, Bobbi Brown's is a very slightly better value when you look at it from a mathematical perspective.  However, the difference in the amounts of product in each stick is so minimal that value is not a make it or break it point for me.  If I could only choose one, I would probably opt for the Hourglass stick.  I was impressed by its creaminess and blendability.  That being said, Bobbi Brown's is pretty great too.  One determining factor between the two may be shade selection if you're still unsure which one to buy.

That's all for today--please let me know if you've tried either of these, or if there are other stick foundations you prefer!

xoxo,
 photo a4b29d75-8d29-42de-b0b5-5faa7f59f9d3_zpse4a2d21e.jpg

Friday, August 11, 2017

Maybelline Great Lash Mascara

If you know me, you know that I love mascara.  The vast majority of mascaras I have tried are from the drugstore.  I think it's hard to justify the price of a higher end mascara when there are so many great ones at the drugstore.  My all-time favorite is L'Oreal Voluminous.  The original and carbon black are my favorite varieties.

I've read over and over that a cult favorite (and a top pick for makeup artists) is Maybelline Great Lash.  This stuff has been around forever.  It's likely that if you're reading this blog, you've tried Great Lash at some point in your life.  If you haven't tried it, you've most certainly seen it in stores.  It's impossible to miss with its iconic pink and green packaging.  I think I owned this back in middle school or high school when I was just getting into makeup, but it's been so long that I didn't remember anything about it.  I decided to try it again to see if it was really worth the hype.


Now, there are a few varieties falling under the Great Lash umbrella.  I ended up purchasing the original in dark brown (this was a mistake--I meant to buy black), but I decided to keep it and try it out anyway.  The first time I tried it, it didn't really do anything for me.  It's been my experience that mascaras usually need some time to dry out in order for them to do what I want them to, so I never judge a mascara on its first use.  I've now used it about four times, and I've decided that I am a fan of this stuff!

Three coats of Maybelline Great Lash mascara in dark brown (two coats on the bottom lashes)


I love the way it fluffs my eyelashes out.  Some of my lashes (especially on my left eye) tend to clump together with this mascara, but I am not someone who minds that because I can work with it to create volume.  I think it still gives decent separation, and I probably could have separated the lashes a little more if I spent more time here.  I did three coats on the top lashes and two on the bottom.  After having used it a few times, it's building pretty well as I layer it on.  I like to do one coat on my right eye, one on my left, a second on my right, a second on my left, etc in order to give it a little time to dry.  This technique works pretty well for me with any mascara.  Also, I love how soft my lashes feel with this stuff!  I'm really not surprised by that, though.  After all, one of its claims is that it "conditions while it thickens."

While L'Oreal Voluminous remains my favorite, I'm really happy I tried Maybelline Great Lash.  It exceeded my expectations; I didn't have high hopes for it.  I will definitely continue to use it and will likely purchase it again in the future (but in black).  I also love how inexpensive it is!  Ulta sells it for $5.99, but I was able to find it at Target for $4.49.

If you've used Great Lash, I would love to hear about your experience with it!

xoxo,


 photo a4b29d75-8d29-42de-b0b5-5faa7f59f9d3_zpse4a2d21e.jpg

Tuesday, April 4, 2017

100% Cream Product Look

Today was one of those days where I sat at my vanity to do my makeup with no planned look in mind.  Maybe it was the dreary weather that had me longing for that summertime glow, or maybe I just wanted to play with makeup I haven't used in a little while.  Whatever the reason was, I went for all cream products.  I love the look of creams--they can often look more natural than powders, and they leave a fresh, dewy, beautifully glowy, youthful finish.


I used the following products for today's look:


*It Cosmetics CC Cream in Tan mixed with Charlotte Tilbury Magic Foundation in 4.5 
I mixed them to get the perfect color match for my skin right now.  I also like the texture of the two when combined--the Charlotte foundation is more satin, and the It CC provides more moisture.  By the way, I did apply moisturizer underneath.  In the summer, I can usually get away with using the It CC as both my moisturizer and foundation.

*Maybelline Fit Me Concealers in Medium and Deep
These shades on their own don't quite work for me, but they're great mixed together.  I may be the only person in the makeup world who doesn't like a super bright under eye area.  Maybe I'm not doing it right, or maybe I haven't found the right products, but that trend does not work for me at all.  It makes my under eye area look grey.  Gross.  I prefer to match my concealer to my skin as opposed to some YouTubers who like to go 22 shades lighter.  In summary, do what works for you!

The formula of this concealer is great, and for whatever reason, I like it a lot more now than when I first tried it a while back.  It's the only concealer I've used recently that doesn't make my under eye area look like alligator skin.

*ELF Aqua Beauty Blush and Bronzer in Bronzed Pink Beige (I only used the bronzer)
This is a wonderful cream duo that will cost you a whopping $6.  I believe it comes in two other colors.  The bronzer and blush are great (use a light hand with the blush!).  The bronzer is a really nice shade for me.  And, according to Jambeauty89 (one of my favorite YouTubers), it's similar to the Chanel Tan de Soleil cream bronzer.  This is one I've wanted to try for ages, but when it comes down to it, I can't bring myself to shell out $50 for it.  So, at least for now, I'm happy with my ELF version.

*Pixi MultiBalm in Wild Rose (used as a blush)
This is a great drugstore cream blush!  It's a nice texture and color, and it seems to last a while on my skin.  I like that it dries down and doesn't stay tacky like some cream blushes, which can be annoying.  It comes in a few other colors as well.

*NYX Away We Glow Highlighter in Moonbeam
I used this stuff on the tops of my cheekbones.  It took me a few tries to get the hang of it.  The best way I've found to apply it is to use 3-4 dots where I want it and blend it in with a brush right away before moving to the other side of my face.  It sets pretty quickly and needs to be blended right away.  It's a beautiful highlighter, and I'm glad I tried it several times before giving up on it.

*Charlotte Tilbury Colour Chameleon in Dark Pearl
I talked about this pretty recently.  It's a beautiful cream eyeshadow that stays put all day!

Add some mascara and brow product, and that's today's look!  I didn't put any color on my lips--I just used my trusty Jack Black lip balm.

If you're intimidated by cream products (and many people are), I hope this inspires you to venture out and try some!  They're not nearly as scary as they seem.

XOXO,
 photo a4b29d75-8d29-42de-b0b5-5faa7f59f9d3_zpse4a2d21e.jpg

Saturday, January 14, 2017

Charlotte Tilbury Makeup


I've been hearing more and more about Charlotte Tilbury makeup through the YouTube beauty community.  A couple months ago, my mom and I stumbled across a Charlotte Tilbury counter in Nordstrom.  We just happened to catch it on the day it opened, and they were offering free makeovers, which I of course had to take advantage of!  Don't you just love getting your makeup done??  It's so soothing, almost like a spa experience.  Anyway, the artist tried a few products on me.  If you're interested to see what I've since purchased from the line, read on.

 Wonder Glow
This is an illuminating primer.  You can use it as a traditional primer underneath foundation.  You can also mix it in with your foundation or use it alone.  This stuff is pricey (honestly, that's pretty consistent across her line), but this is one product that is absolutely worth the splurge.  It gives you such a beautiful lit-from-within glow without looking glittery.  It's subtle and makes your skin look healthy.  The artist who put it on me called it "Gisele in a bottle."  I love wearing it alone or underneath the foundation I'll mention next.  It retails for $55 and can be found here.

Magic Foundation
This foundation is really great.  It comes in a beautiful glass bottle with a pump, which is always a bonus.  It blends in really easily with a Beauty Blender (my favorite), a brush, or even your fingers.  Once blended in, it leaves a beautiful, flawless satin finish on the face.  It holds up pretty well throughout the day.  I think most skin types could use this, although it can cling to dry patches, so be sure to moisturize well before applying this.  It looks even better with Wonder Glow underneath.  It also hasn't irritated my skin or broken me out.  I am in the shade 4.5.  Check it out here.

Color Chameleon Eyeshadow Pencil
This may be the most impressive product I've tried so far from her line.  I love cream eyeshadow sticks.  It doesn't get any easier than drawing some on and smudging it out.  The problem is that they almost always crease on me or wear off throughout the day.  This stuff is so easy to use, and it stays put all day (and it has been tested through a workout!).  I have the color Dark Pearl.  It's absolutely stunning on its own but also looks great layered underneath the eyeshadow quad I'll mention below.  It's perfect for the lower lashline, too.  Possibly the only downside to this pencil is that it's not retractable and does need to be sharpened.  However, it's something I'm willing to put up with because I love this product so much!  Check it out here.

Side note: please excuse the line on my wrist from my hair tie :)


Luxury Eyeshadow Palette
This was the item I needed the least out of the bunch--I needed another eyeshadow palette like I need a hole in my head.  But it was something I kept thinking about for quite a while after the artist used it on me, so I finally decided to bite the bullet.  I own the one called The Sophisticate.  I am so happy with this purchase.  The shadows blend really nicely, and the colors are beautiful.  It's small and is great for travel.  On a day-to-day basis, I use the lightest two shades to just give my eyes a little definition.  If I'm going out, I love dolling up the look with the two darker shades.  And, as I mentioned above, it looks awesome layered on top of the Color Chameleon pencil.  If you have a lot of eyeshadow in your collection, this is probably not a necessity.  It is, however, a nice splurge.  I have used it almost every day since I bought it and am happy to have it.  It's become my new go-to palette.  If this is something you're interested in, you can find it here.


Overall Thoughts
So far, I'm very impressed with this line.  I think my collection will only grow from here.  It also doesn't hurt that her products are beautifully packaged!  Who doesn't love a little rose gold?

Thank you so much for reading!  Please comment and let me know what your favorite Charlotte Tilbury products are!


XOXO,
 photo a4b29d75-8d29-42de-b0b5-5faa7f59f9d3_zpse4a2d21e.jpg